Atlas Documentation
This book organizes software documentation for Atlas, covering features and tools inside the program.
Table Editor
Using the Table Editor
Table Editor
The Table Editor is a critical view in Atlas. Using the Table Editor, you can change calibration lookup tables and modify ECU behaviors resulting from their computed values. Most, if not all, recalibration done on your ECU will happen from within the Table Editor, so it is crucial to understand its capabilities and how to navigate around it.
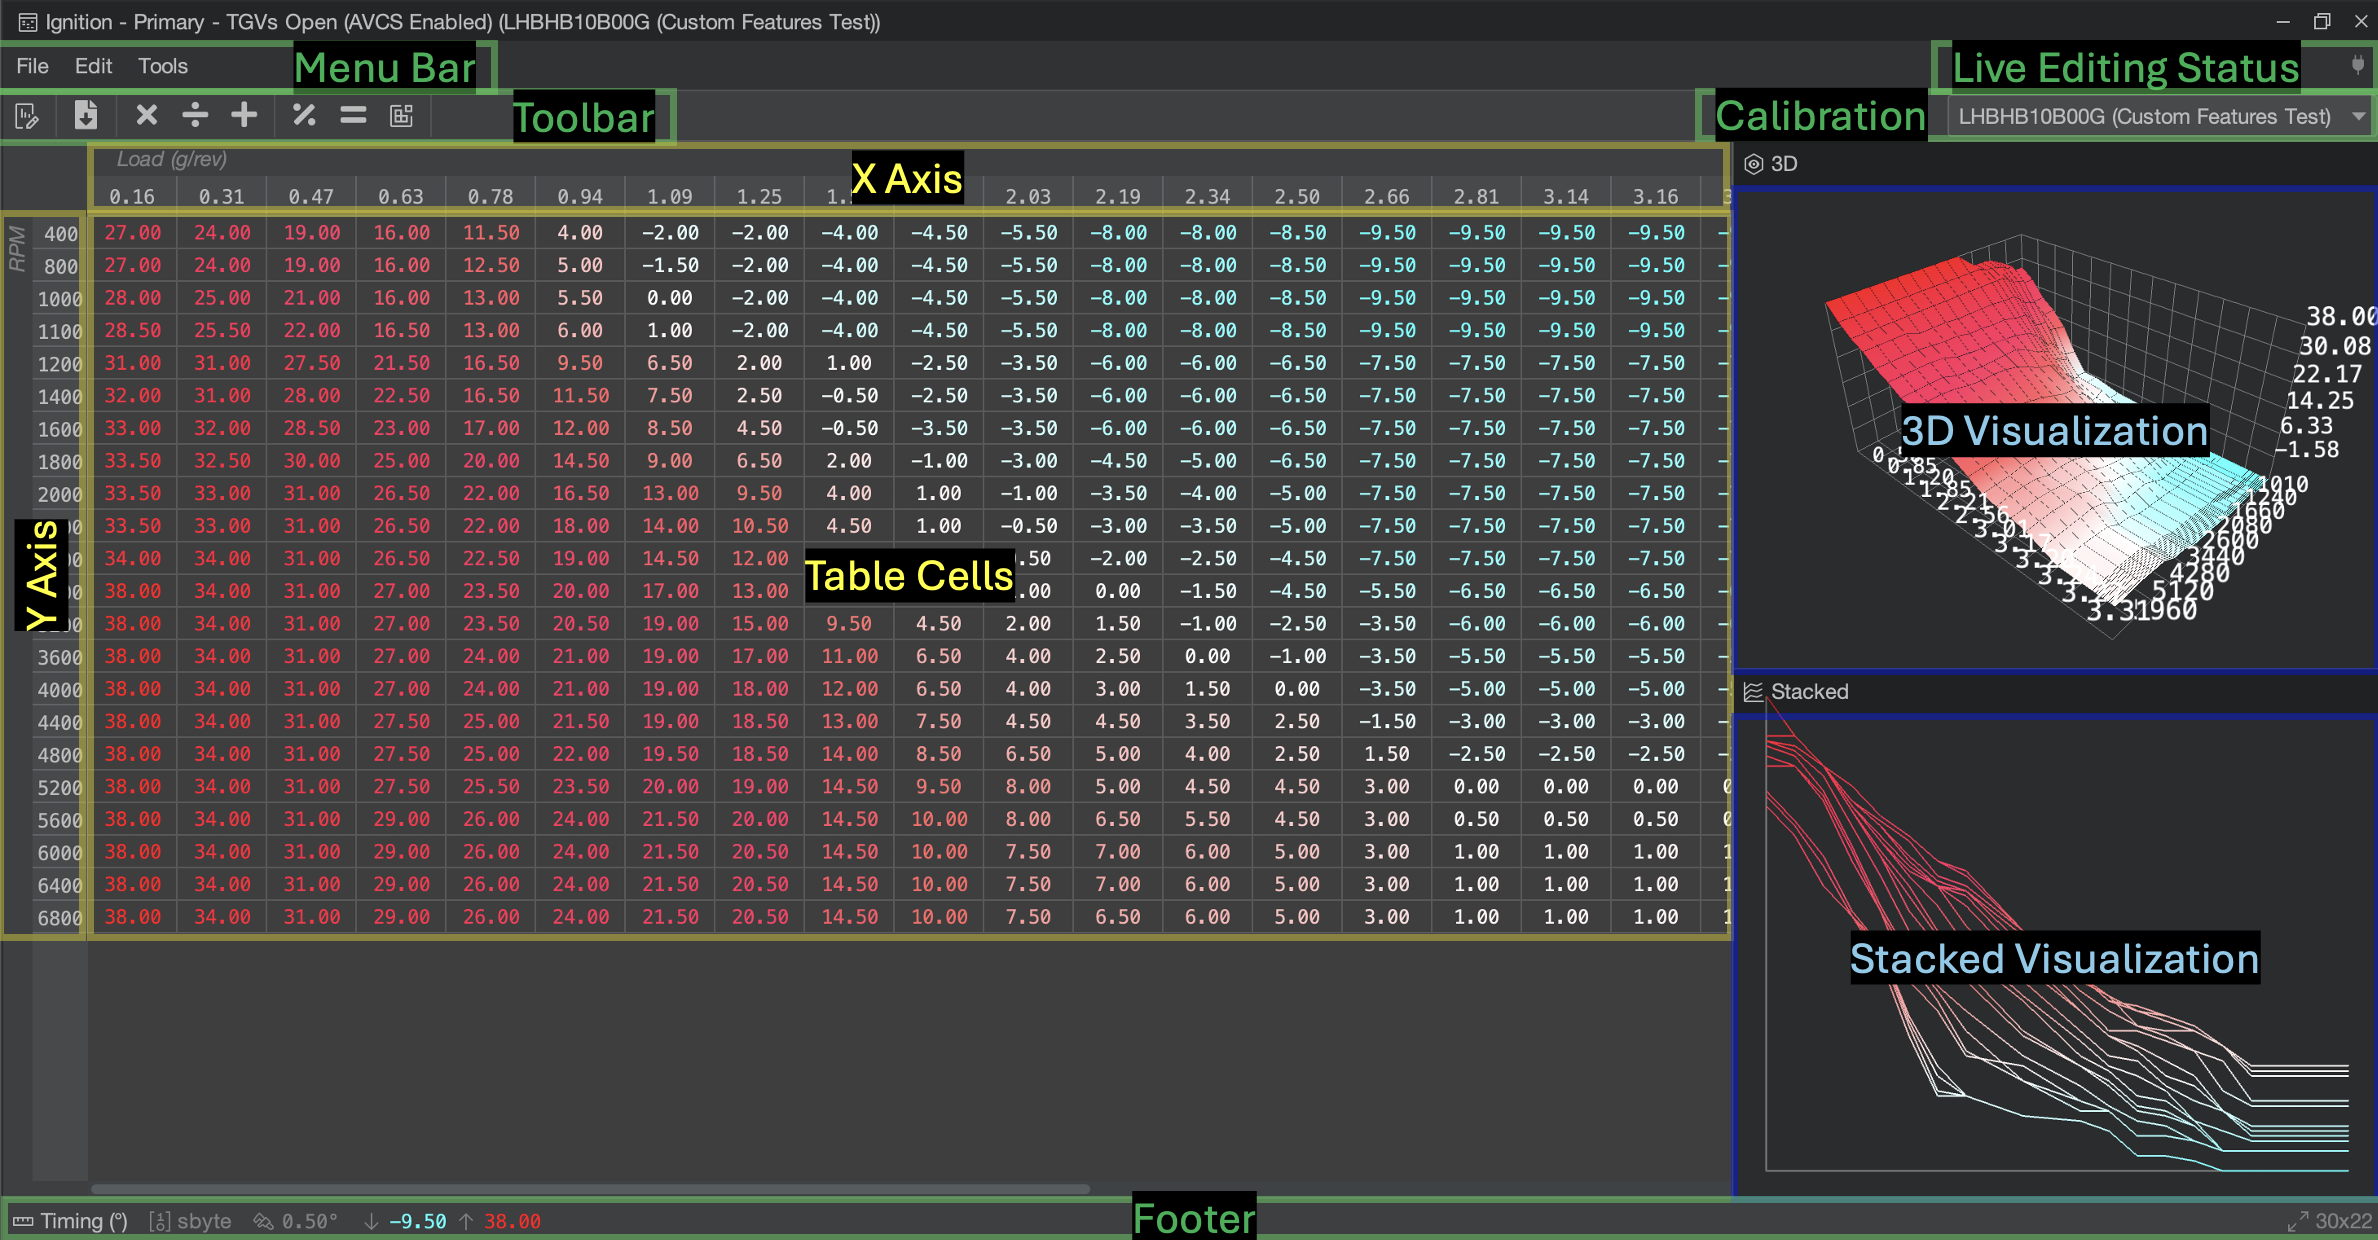
Menu Bar
The Live Editing Status Area on the right-hand side of the Menu Bar shows you the current state of live editing in the Table Editor. If a red "LIVE" box appears, then any changes you make in the Table Editor will be immediately reflected on the ECU, so be careful when making changes. Sometimes, you might see a yellow "Resync" label. Click this label to redownload the ECU's table copy so you can return to a LIVE session, but beware: any local changes will be lost.
For more information and diagnostics on Live Editing, see the documentation page:
Toolbar
The Toolbar has a series of quick actions that you can perform such as exporting the table data, and performing mathematical operations on selected cells, such as adding values or averaging them.
The Calibration Area on the right-hand side of the Toolbar allows you to quickly change the Table Editor between different calibrations in your project. Most of the time, you only want to edit Global Calibration, which has its own dropdown in the Atlas Toolbar outside the Table Editor in the main Atlas window. However, you can change each Table Editor independently as you work.
Keep in mind that when the Global Calibration changes, any Table Editors that are currently selected to that calibration will also update to the newly selected Global Calibration. Any Table Editors that have selected a different calibration than the Global Calibration will not track the Atlas Global Calibration as it changes, unless the Global Calibration being changed from agrees with the Table Editor's calibration.
Table Area
X Axis / Y Axis
The axes for the table are listed alongside the table contents and scroll with the table cell data as you pan/scroll through it. Right-click on an axis's header to edit its contents. Be very careful! Atlas will allow you to edit any Axis, even if it might be dangerous. Editing axes can cause unintended behavior in the ECU; we recommend double-checking with our community (i.e. Discord) before editing axis data in your ECU, unless you know what you're doing.
Table Cells
The Table Cells for the table is the large area in the center of the Table Editor. In this area, you can perform several actions and modify table cell data unless the currently selected calibration is marked as read-only.
When Table Cells change, they will flash a certain color depending on what has been updated. Cells flash yellow when they have updated the calibration (or "ROM") only, as in the case with offline work, but flash green when the data has also been updated on the online ECU in a live session.
| Action | Keystroke(s) | Description |
| Enter Cell Data | Type any number | Enter cell data by first selecting cells you want to edit, then type a number and press Enter/Return to have the entire selection update to the entered value. |
| Undo | Ctrl+Z (Cmd+Z) | Undo the last edit. |
| Redo |
Ctrl+Y (Cmd+Y) | Redo the last undone edit. |
| Add |
Shift+(+) | Type the "+" character (Shift and the "+" key together) to start adding a value to the current selection. Tip: use a negative number to quickly subtract a value. |
| Multiply | Shift+8 | Type the "*" character (Shift and the "8" key together) to start multiplying the current selection by a coefficient. |
| Divide | / | Type the "/" character to start dividing the current selection by a coefficient. |
| Interpolate | i |
Type the "i" key to immediately interpolate the current complex selection. Interpolation behaves differently than other actions. Selected cells will be treated as anchors and will be unchanged, but any cells in between the anchors will be interpolated according to the Table Editor's current interpolation algorithm. |
Selection in the Table Editor can either be Simple or Complex. The following table breaks down these two selection modes:
| Simple Selection | Complex Selection |
|
Click and drag to make a simple selection. Use Ctrl/Cmd + A together to quickly select the entire table. |
Start with a simple selection (or one cell), and hold Ctrl/Cmd while clicking other areas of the table to produce a complex selection. Complex selections are a key feature with Interpolation. |
|
|
|
Interpolation
Interpolation in the Table Editor
Interpolation is a feature in Atlas that allows you to effectively smooth table cell data. Using interpolation, you can create gradients that prevent the ECU from suddenly "jumping" in values, helping to avoid detonation and create a smoother driver experience across a map.
Interpolation relies on Complex Selections for more advanced calibration editing. Due to the internal algorithm being based on complex selections, Interpolation enables you to quickly design a map in fewer interactions with the editor and speeds up your workflow.
Basics
Horizontal/Vertical Smoothing
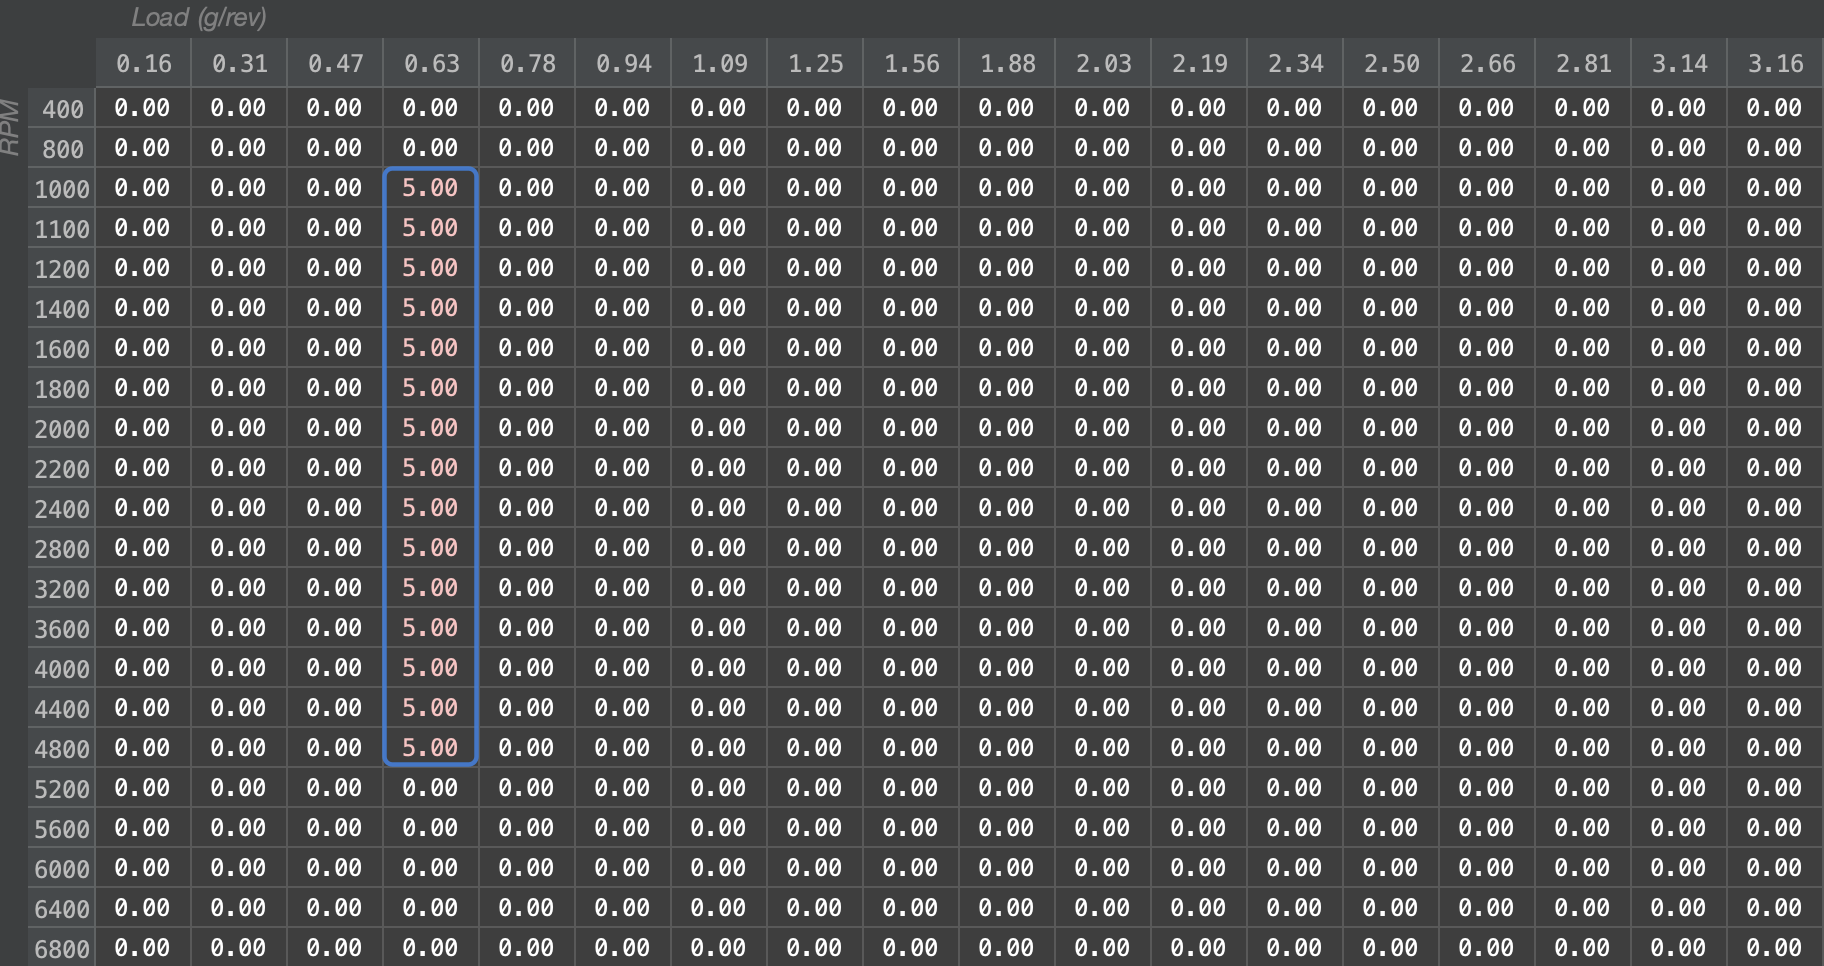
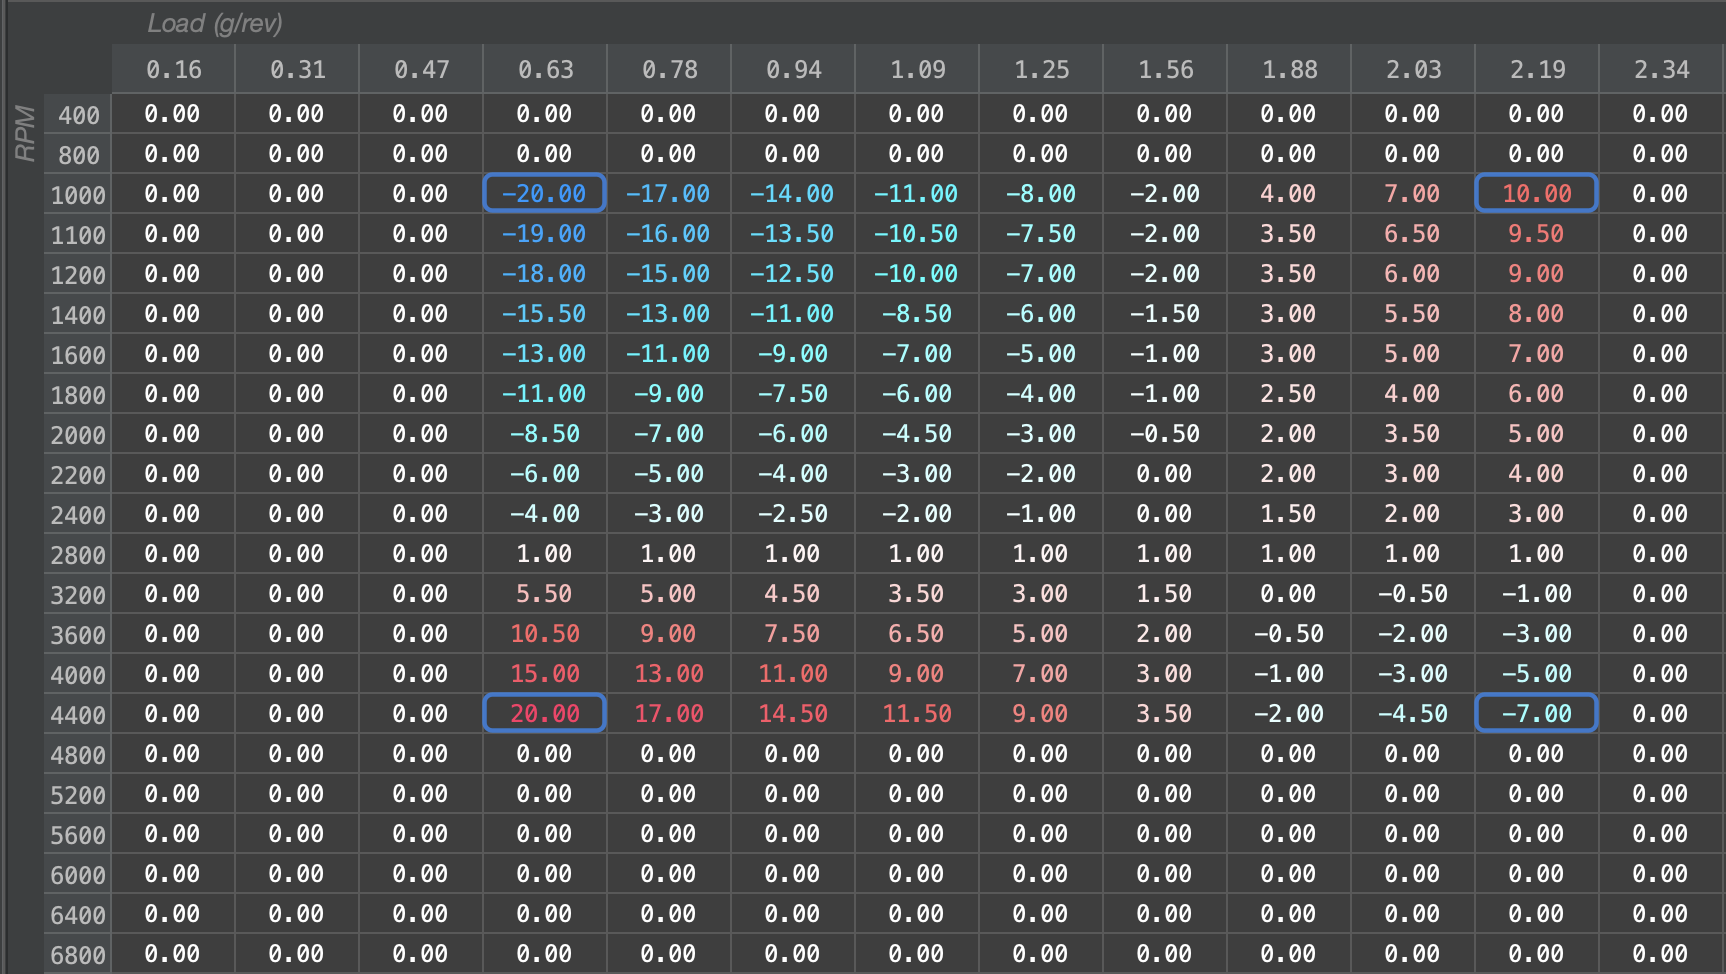
Take the following table as an example, it is an ignition timing table will all values set to 0:
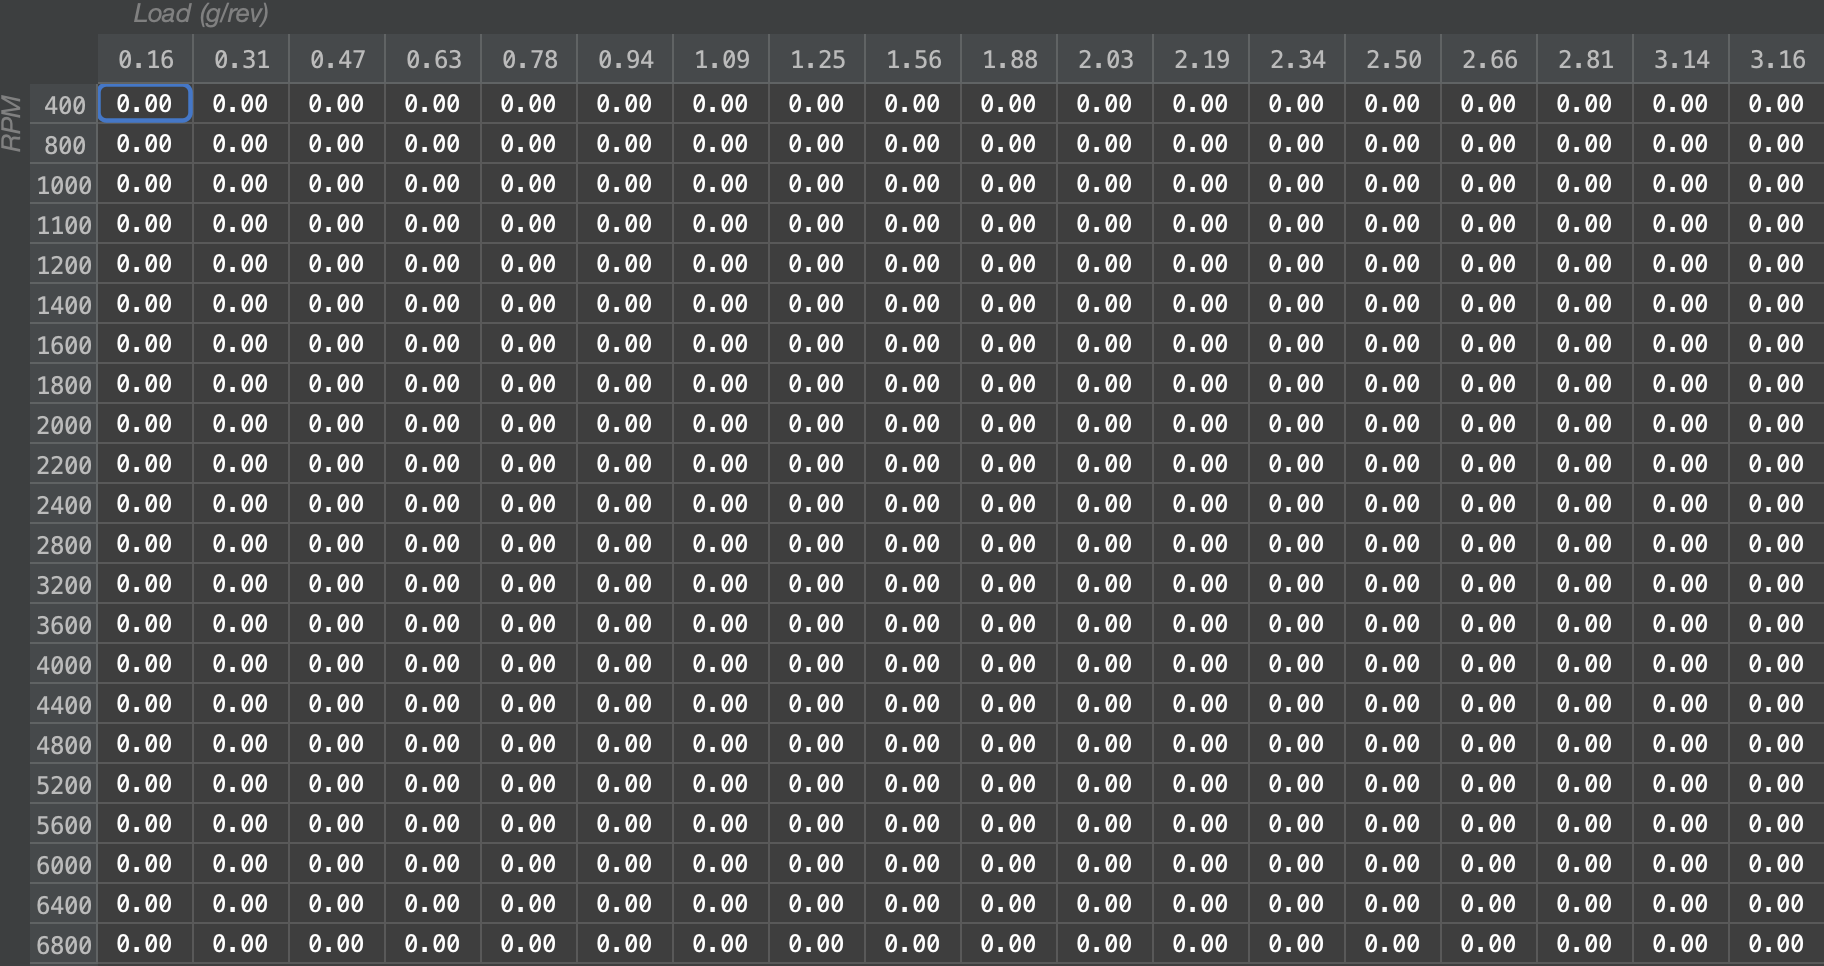
Let's begin by selecting an area of the table and setting the values to 5 degrees:
Holding down the Ctrl/Cmd key on our keyboard, we will click on another cell, such as 2.34g/rev x 2000RPM:
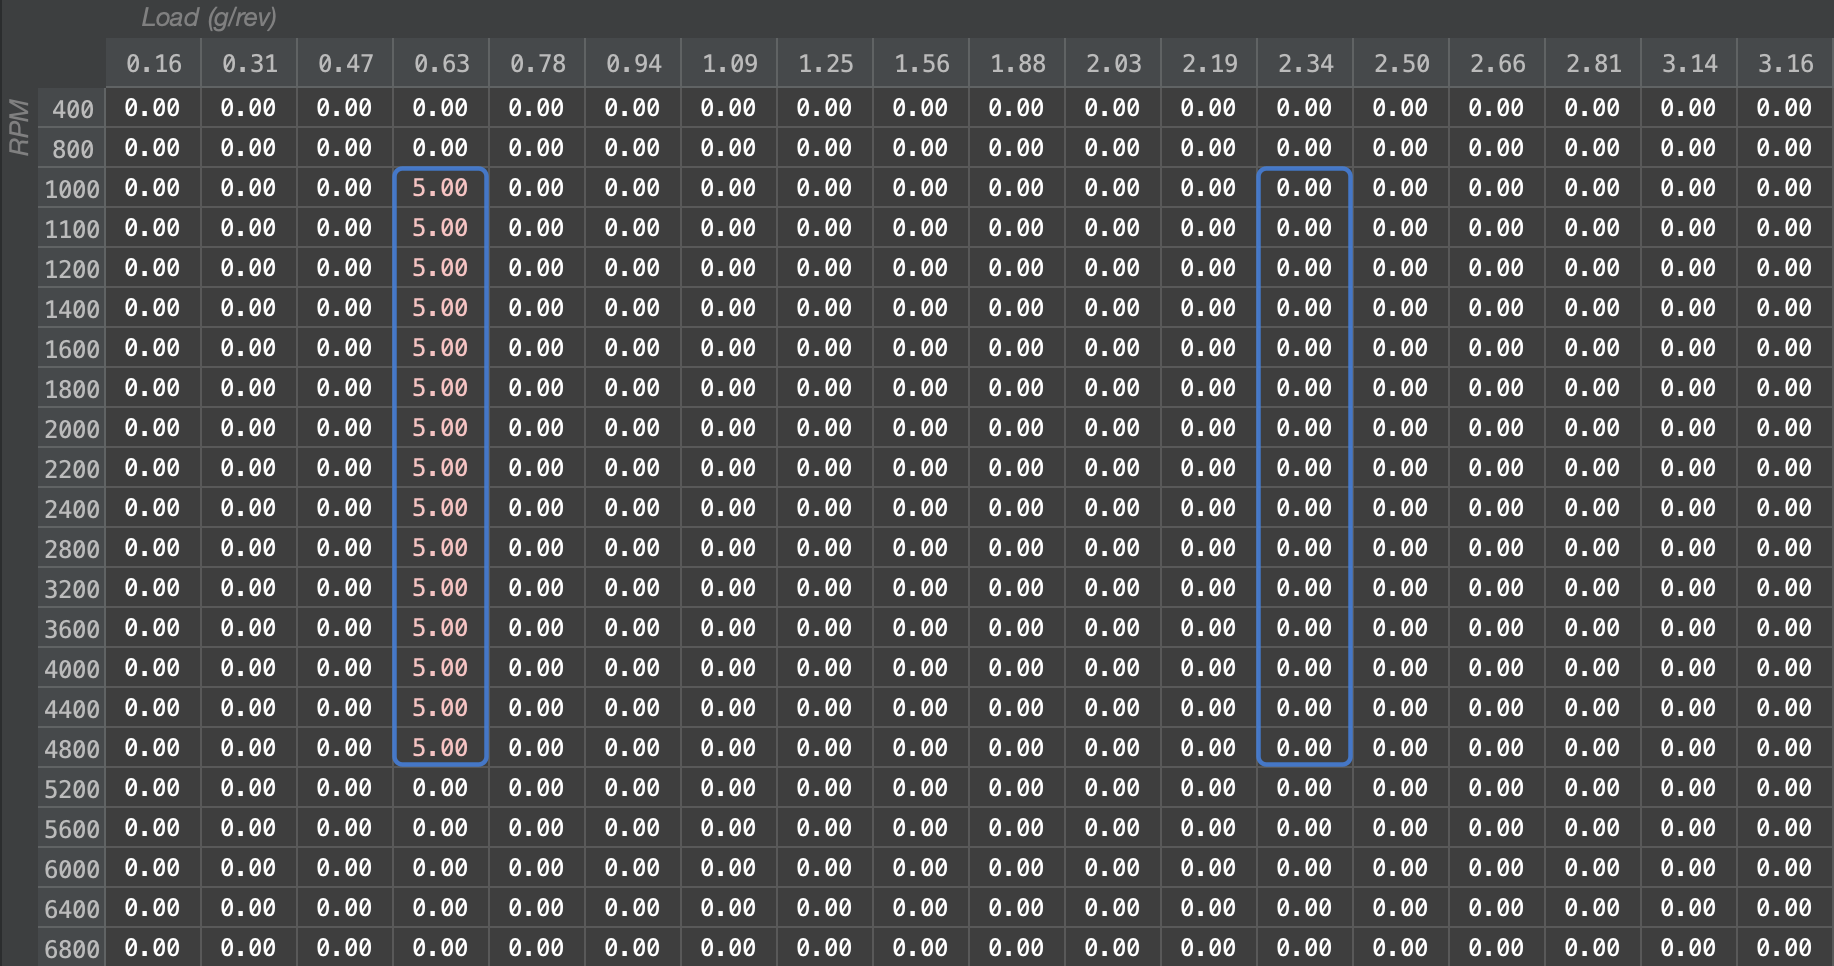
A Complex Selection has now been started. As you can see, a duplicate-sized column has now been selected in the area we clicked. Now, press the "i" key on the keyboard to immediately interpolate the empty space between the two highlighted columns:
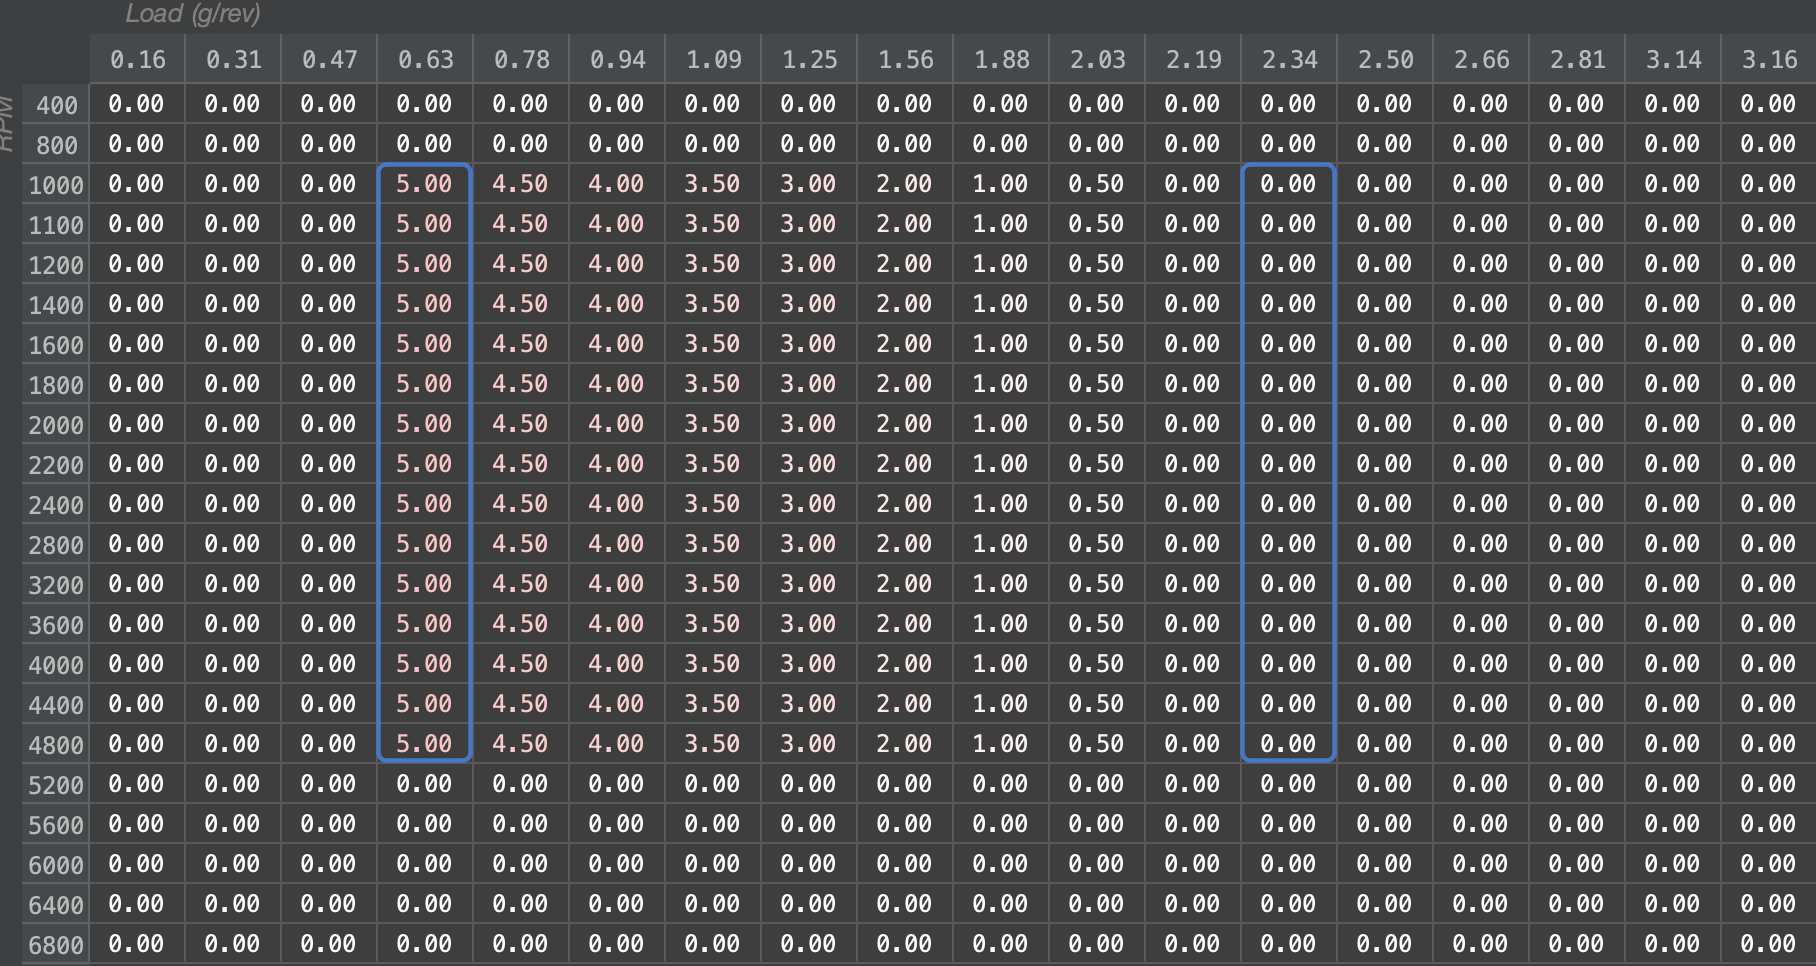
As we can see, the table has been interpolated in the empty space, smoothing from 5.00 degrees to 0.00 degrees. The highlighted columns did not change, as they are treated as anchors in the interpolation algorithm.
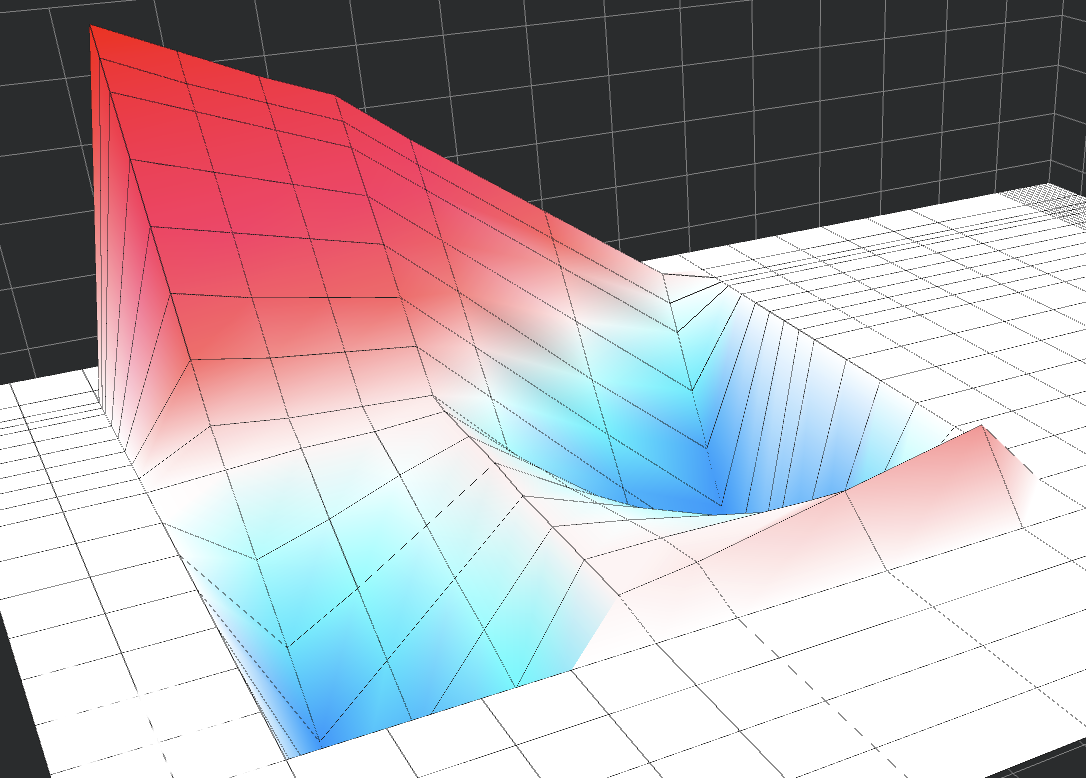
Corner-Based Interpolation
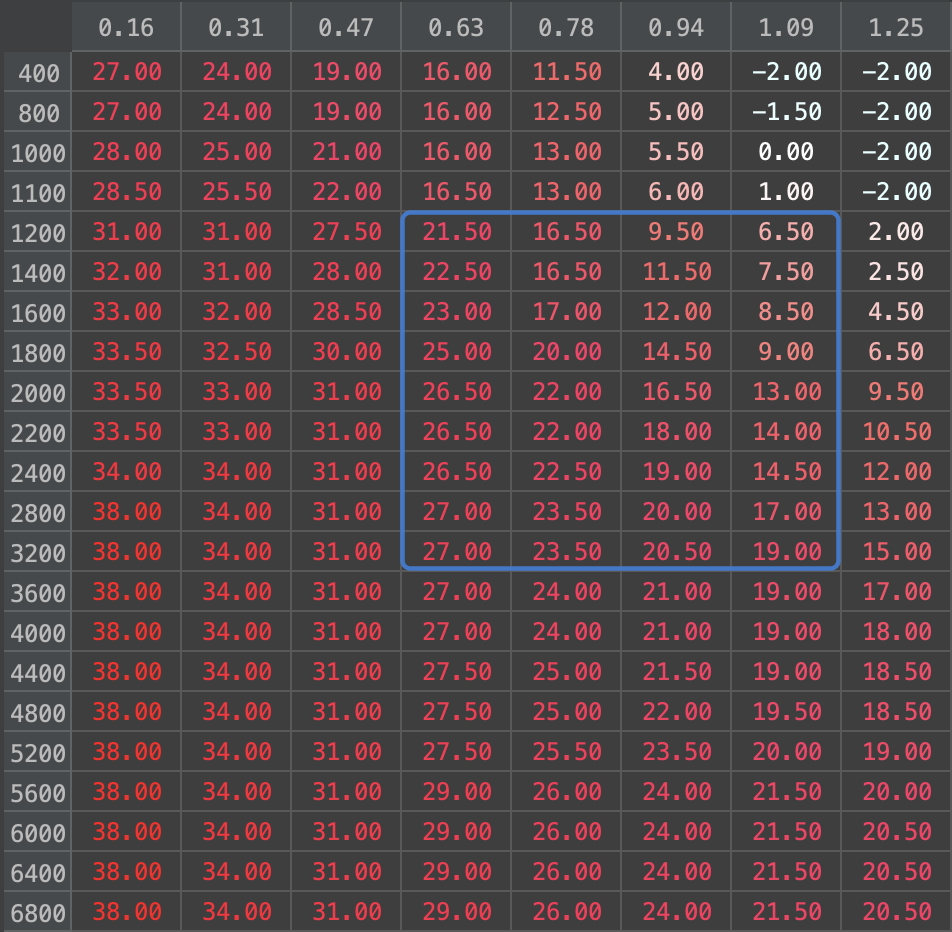
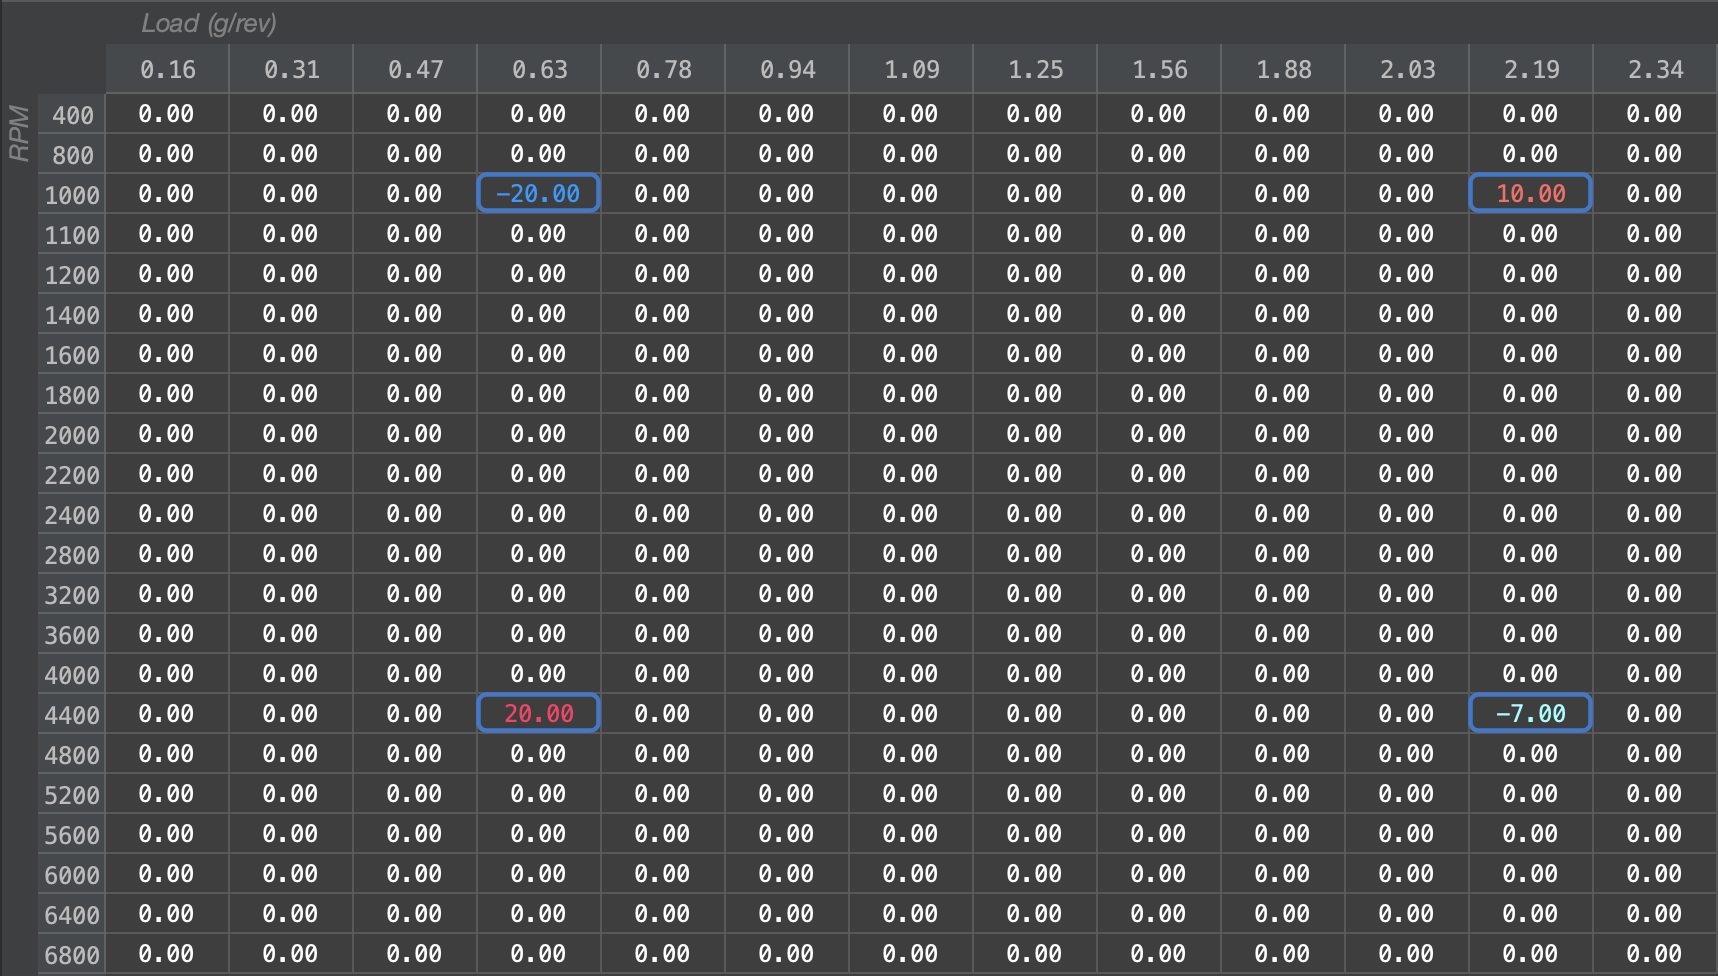
A typical use-case for interpolation is interpolating corners of a table. In this example, we'll interpolate 4 corners and create a blended map between them.
Selecting the 4 corners desired for interpolation by holding the Ctrl/Cmd key and clicking on each anchor of the area to interpolate, press the "i" key to immediately interpolate the area of the box using the anchors as waypoints for the operation:
Advanced
Smoothing with a Waypoint
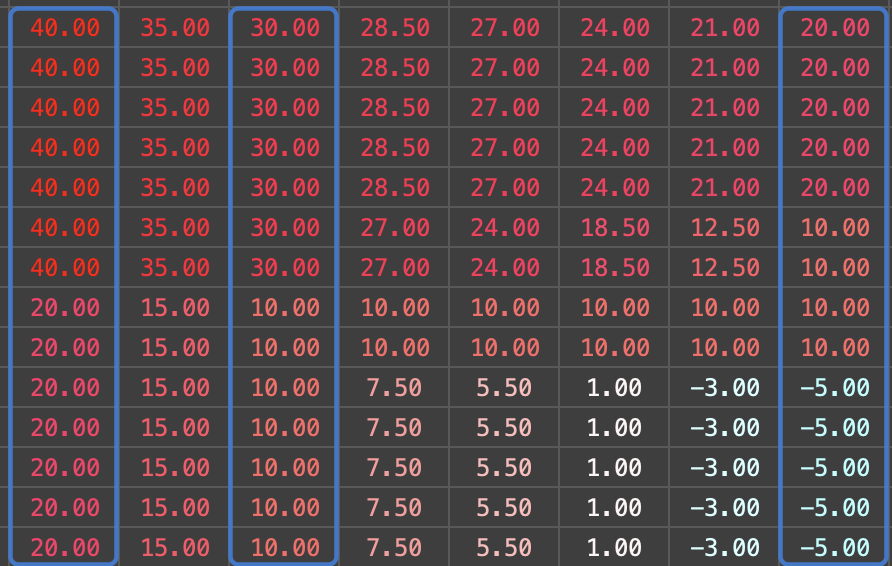
By selecting multiple columns (or rows), we can create a way-pointed interpolation. The values under the 0.94 g/rev column will be unchanged, and will instead be used to interpolate the values to the left and right as they approach the other anchors at 0.63 g/rev and 2.03 g/rev.

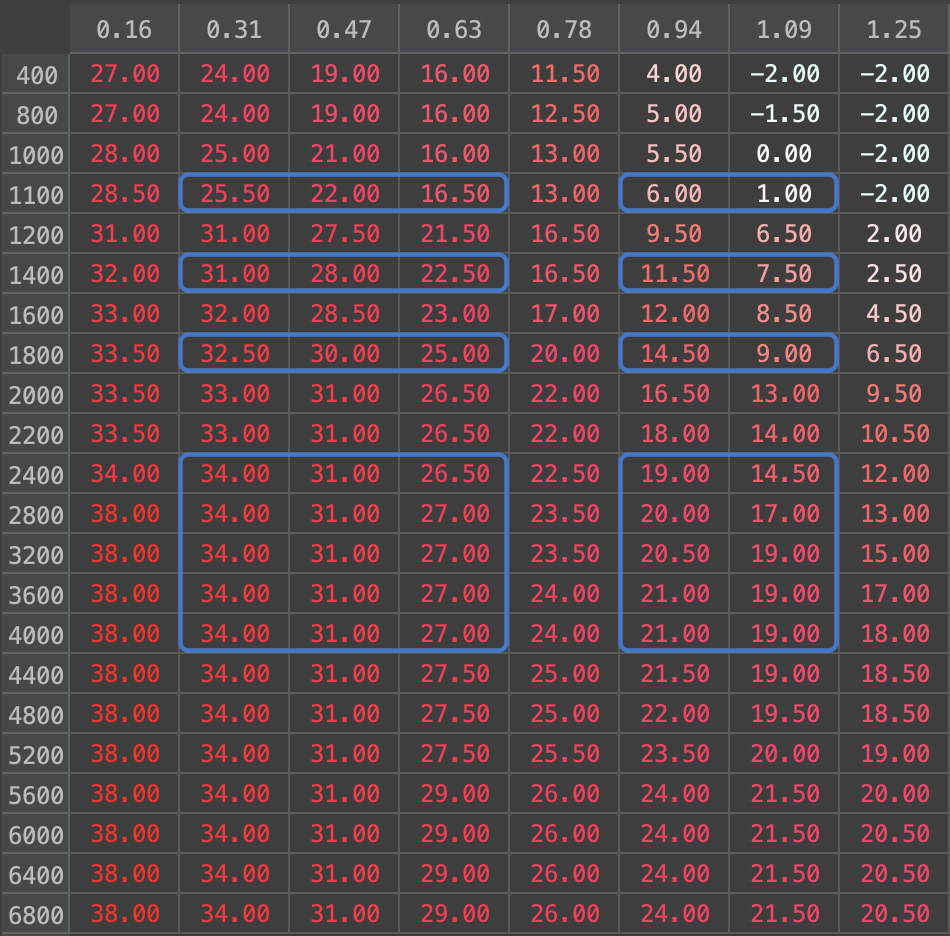
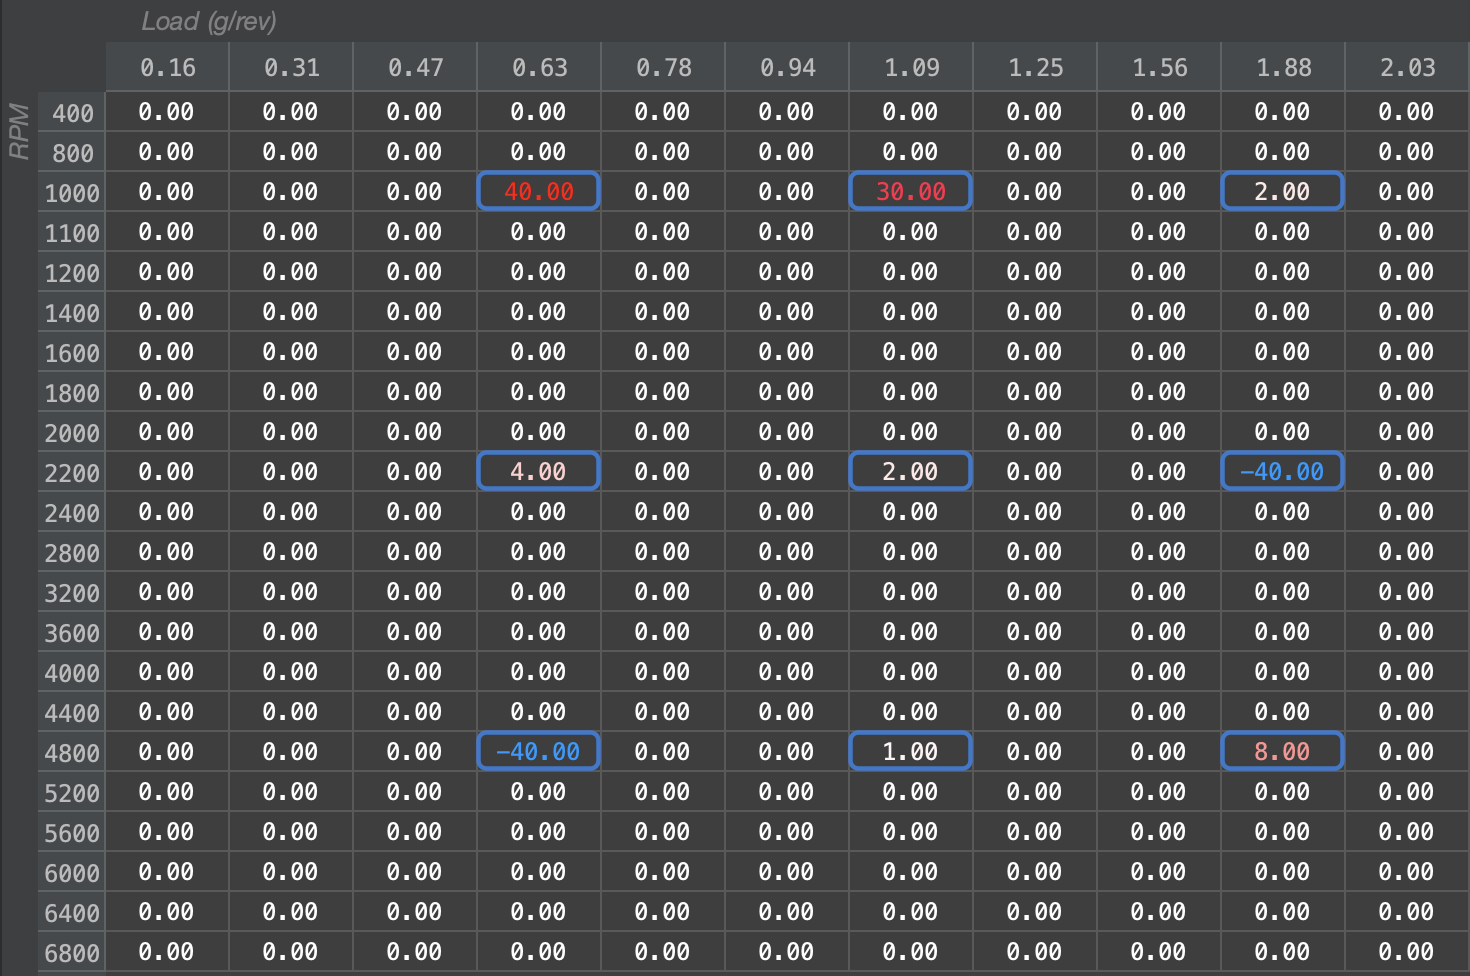
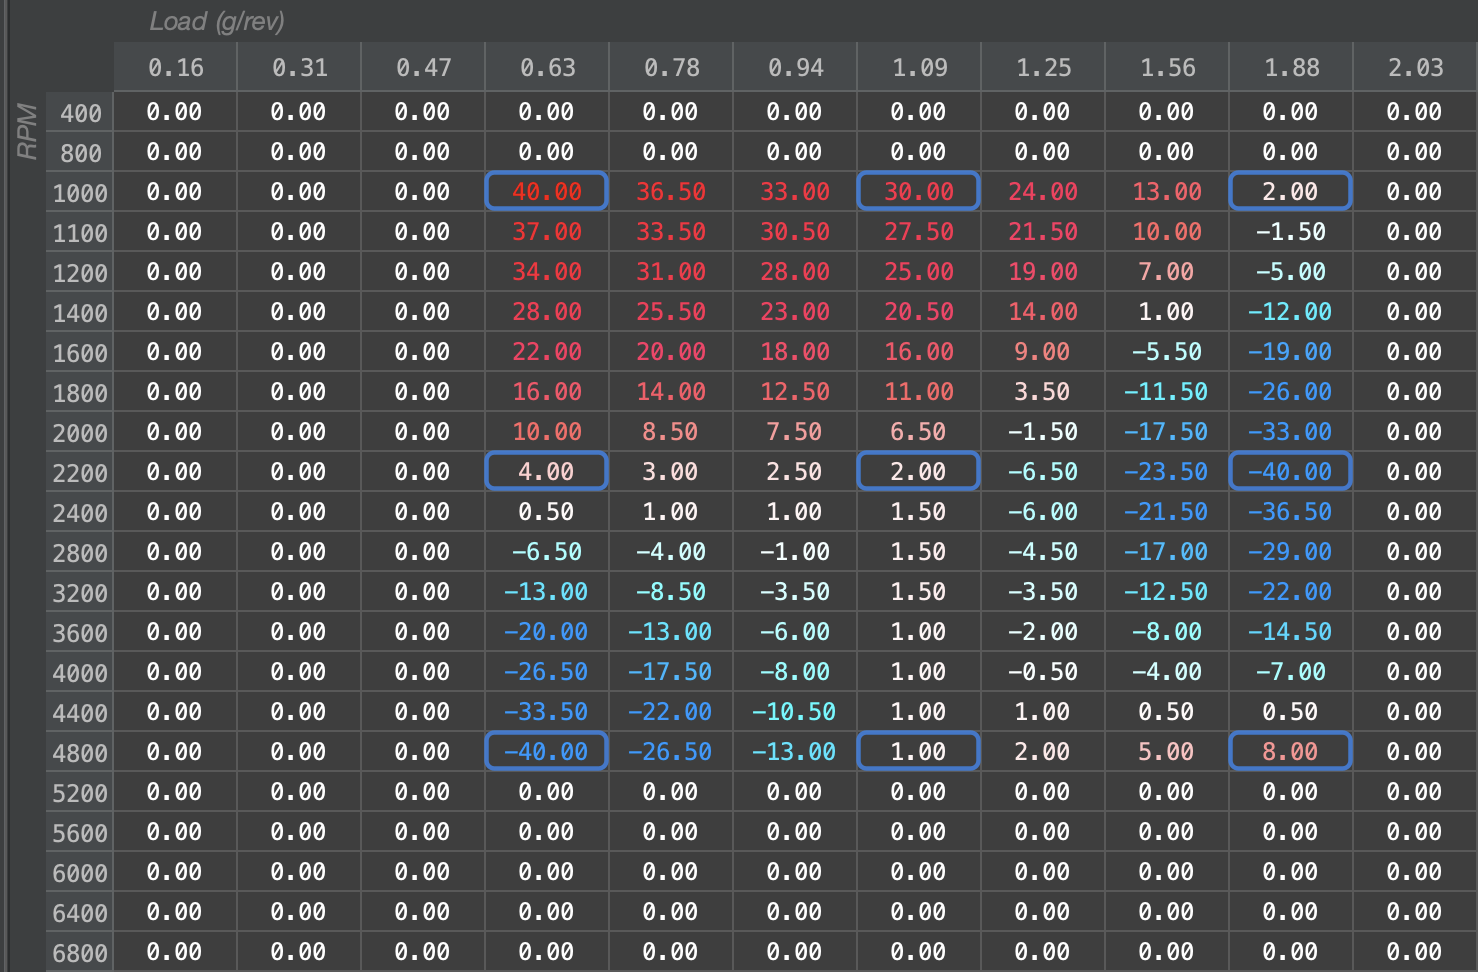
Multiple Waypoints
In a very common scenario, you may want to create a map from a series of waypoints as shown. In this example, we select each cell using the Cmd/Ctrl key and use the "i" key to quickly interpolate between each of the waypoints.
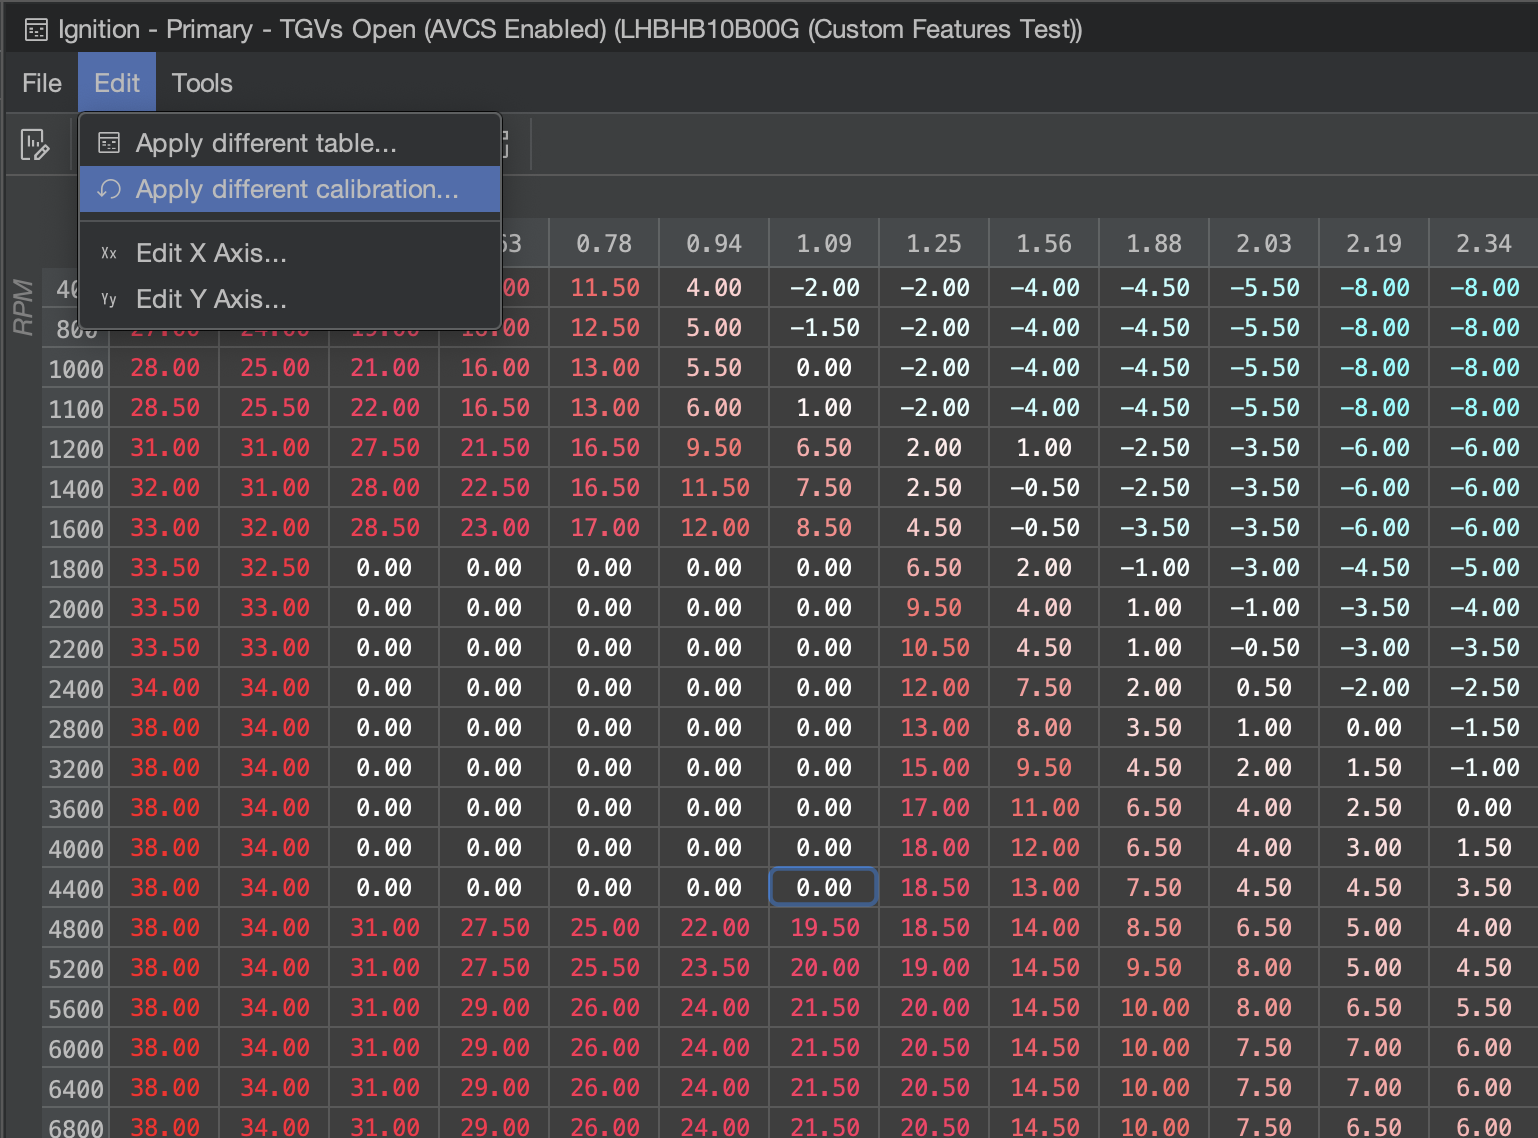
Reverting to Another Calibration
If you would like to revert your changes in the current calibration to another calibration, you can always Apply a different calibration by clicking Edit -> Apply different calibration...
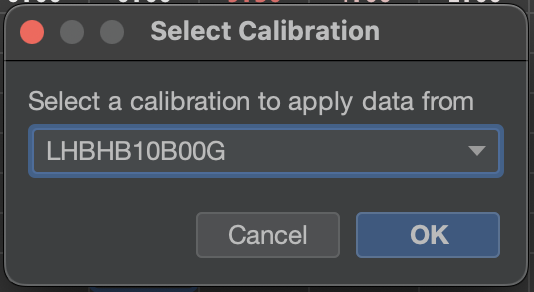
The default selection in the Select Calibration dialog box will always be the Base Calibration you set for the current calibration, if applicable, for faster reverting:
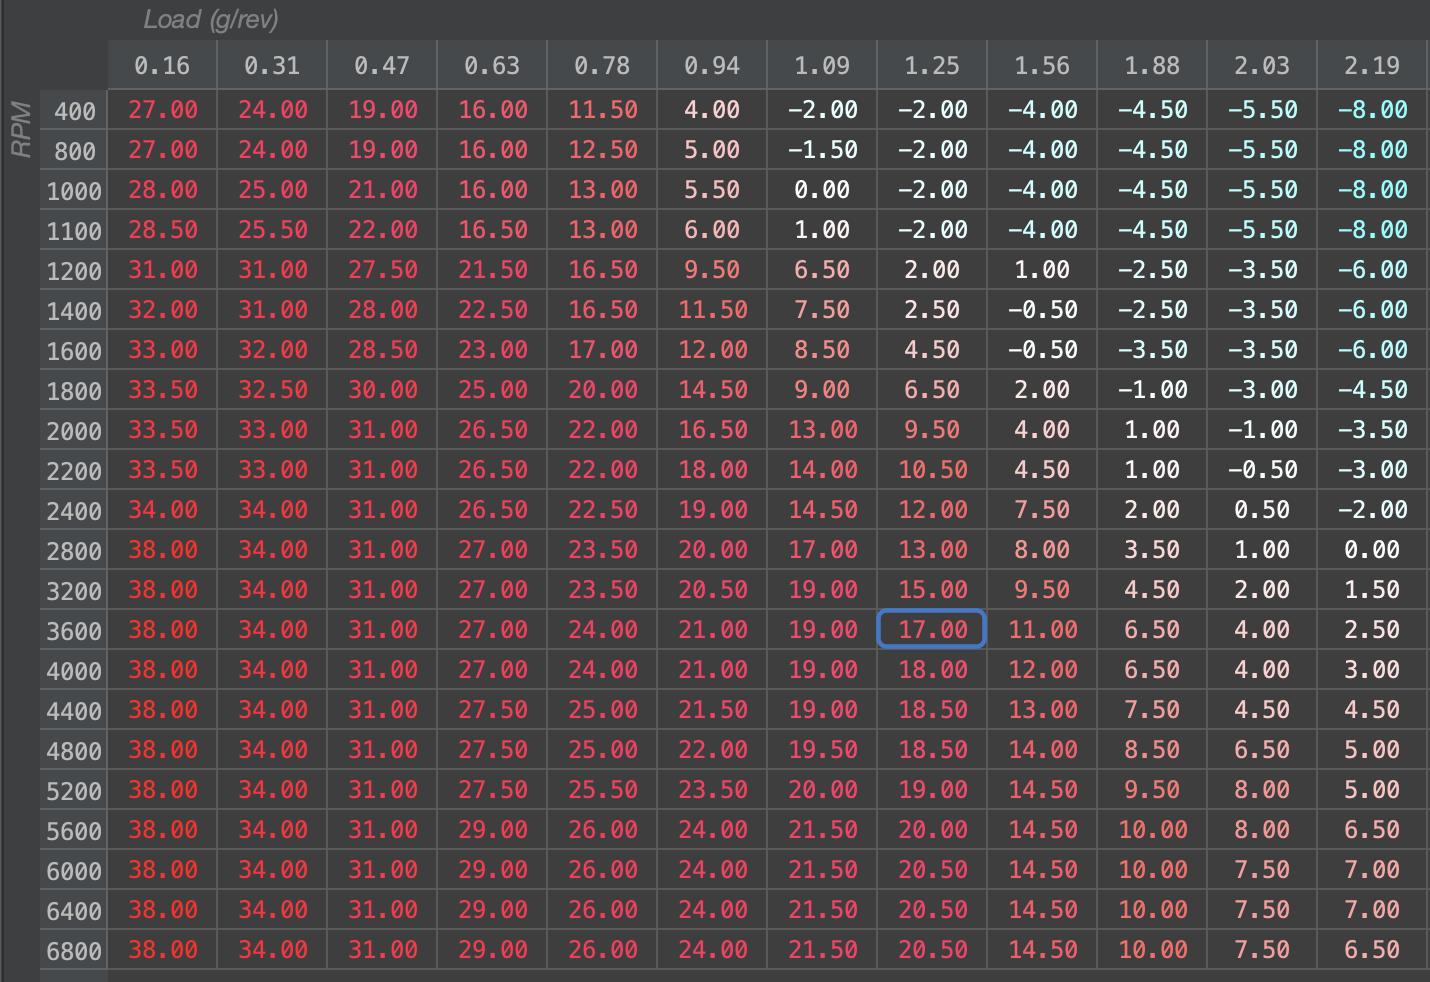
The calibration will be updated. Note that only selected cells will be changed. In this case, Ctrl/Cmd+A was used to select the entire table before the operation took place:
Flashing
Flashing a Calibration
Introduction
2023+ WRX MT Users
If you are using Atlas 2024.4 or earlier, recovery is not possible on these ECUs. Atlas 2025.1 and later resolves this issue upon first programming with the ECU.
In order for a calibration (tune) to be recognized completely by a vehicle, you need to transfer and permanently store it in the vehicle's flash memory, or ROM. For this to take place, you need to instruct Atlas to perform the "flashing" process with the vehicle. Flashing is an easy process, but it is possible for it to fail if careful steps are not taken. Please ensure the following is true for your scenario:
- The vehicle has ample battery capacity remaining to supply the electrical system in your vehicle for at least 30 minutes (we recommend turning off headlights/auxiliary electrical components) - don't try to flash a vehicle if it hasn't been started and driven for a long period of time (allowing the alternator time to charge the battery again).
- Your laptop/computer/etc. has ample battery capacity as well to avoid shutdown for at least 30 minutes.
- The vehicle is parked, stationary in a safe location such that anything to go wrong, recovery procedures can be run without interruption.
- Ideally, is connected to a high-amperage battery charger supplying the battery itself with current. Flashing will work without a battery charger connected, but we strongly recommend using one whenever possible to avoid flashing interruptions that can cause your ECU to enter recovery mode.
- The connection you can make with the OBDII port is firm and does not risk being accidentally unplugged with your position in the vehicle (i.e. shifting, moving around) and how it relates to any wires running to the OBDII port.
Vehicle Connection
To reflash, Atlas needs to be connected to the target vehicle. Please see our supported adapter page for full details.
Tactrix OpenPort 2.0 "Connection failed" Error

Sometimes, the OpenPort 2.0 can lose sync with the computer running Atlas. Make sure you always first connect the adapter to your computer running Atlas. Then, connect the OBD2 end of the Tactrix to the vehicle's OBD2 port, often located underneath the trim in the steering wheel area. Doing this in the reverse order can sometimes cause the Tactrix to incorrectly synchronize with your computer and Atlas.
Procedure
Atlas does not support reprogramming ECUs that are actively programmed by other 3rd-party, aftermarket tuning products in order to respect and honor their confidentiality agreements with their customers. Please "unmarry" the ECU from the aftermarket solution first, in order to return it to a factory state, before proceeding.
Make sure the vehicle is in its "Accessory Mode" mode, with the engine not running, but the gauges active. You may see a Check Engine light in this mode.
For key ignition vehicles, turn the key to the "ACC" position to enter this mode.
For push-to-start vehicles, push the ignition button twice with no pedal input (Clutch or Brakes) to enter this mode.
First, make sure you have selected your desired calibration to flash by selecting it in the Active Calibration dropdown menu in the upper-right part of Atlas. Then, click the Flash button,

After a brief period, you will be greeted with this prompt,
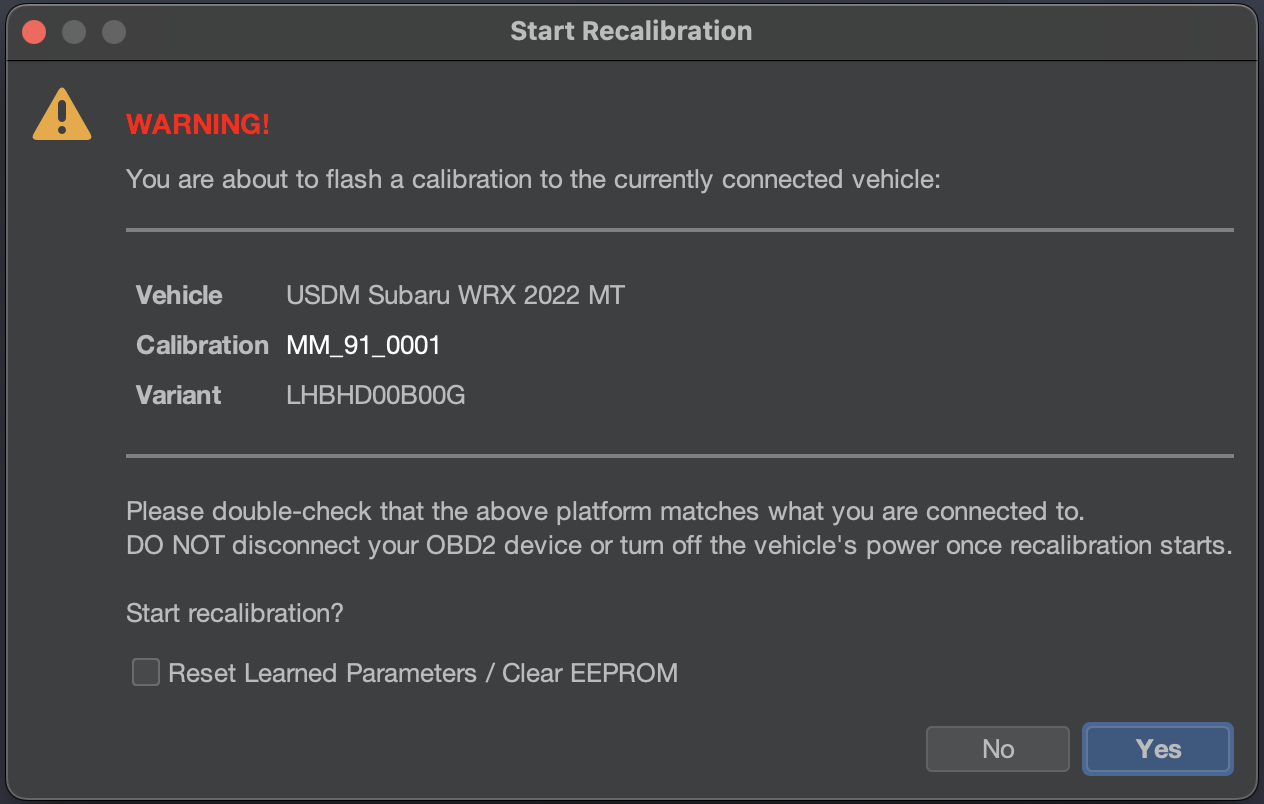
- Make sure the Calibration listed is the one you want to flash
- Make sure the Vehicle listed is the one you want to flash
- If you are flashing a new tune, we strongly recommend checking Reset Learned Parameters.
There is no turning back or any chance to interrupt the reprogramming once you click Yes. Make sure you are positive before continuing with reprogramming!
We recommend double-checking your sitting position, reducing any risk to an unplug scenario at this time, and laptop battery charge at this time. When you are ready, click Yes.
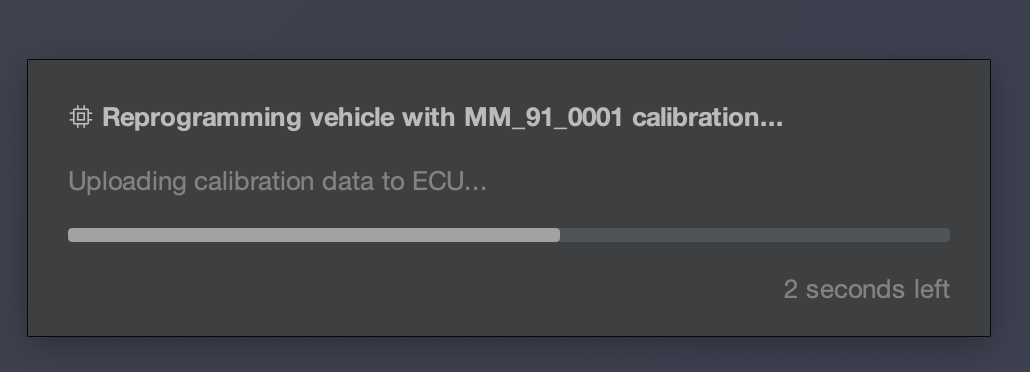
The flash data will be reprogrammed to the ECU. Typically, for fast flashes, this can take anywhere from 10 seconds to 5 minutes. Depending on your adapter's capabilities and speed, this may take longer. If necessary, Atlas will automatically enter Recovery Mode to recover the ECU with the selected calibration, and the process may start over.
Once the process completes, you will be greeted with the Reprogramming Complete screen:

Turn off the vehicle's ignition in order to completely shut down the vehicle. Click OK.
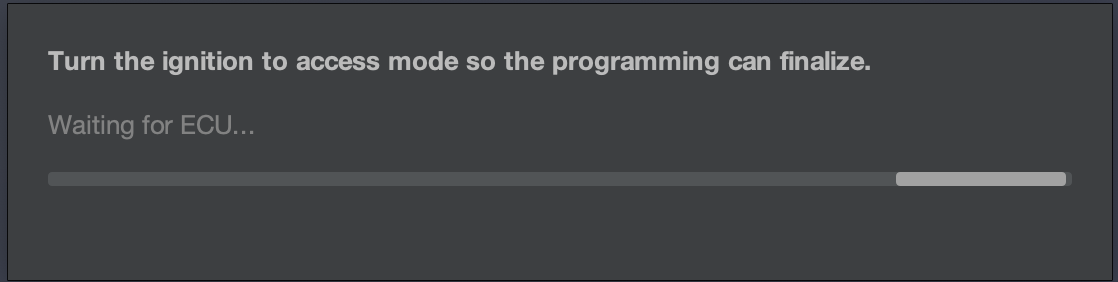
Atlas will now be waiting for the vehicle to return to its Access mode it was previously in. Allow the vehicle 10 seconds to fully shut down any internal electrical components that may still be in a flashing state, and return the vehicle to Accessory mode.
Atlas will then clear any non-persistent diagnostic trouble codes (DTC) that were accidentally tripped by any vehicle components during the flashing process, and the flashing process is complete!
Fast Flashing
Atlas supports "fast flashing" a vehicle, but only if the target ECU supports this. If the vehicle supports fast flashing, this will automatically take place.
Fast flashing, in most cases, will apply to any programming event with the vehicle, including first programming (sometimes referred to as "marriage").
Recovery Mode
For more details on following through with a recovery process, see our flash recovery procedures page.
Description
Most vehicles have a manner in which you can recover the ECU should the flashing be incomplete. For the Subaru WRX (2015+), for example, your bootloader (never reprogrammed by Atlas) has logic which runs on start that will attempt to see if the flash had been correctly programmed. It does this by looking at the first and last sections of your programmed ROM to see if certain data it expects to be present are in place. As flash data is sent in a ordered fashion, it is unlikely that both sections will ever be correct if the reprogramming is ever interrupted. If these sections are not correct, your ECU will enter recovery mode. In recovery mode, your ECU cannot operate the vehicle, but instead is waiting for a new ROM to be uploaded.
If, for example, power is lost to the ECU while flashing (low battery/etc.), this is the mode you will more than likely end up in. If Atlas fully supports your vehicle and your ECU also has a recovery mode that Atlas can interact with, Atlas will handle interacting with your ECU in this recovery mode.
Bricked ECUs
Please first see our flash recovery procedures page, as Atlas 2025.1 and later ships with a brick protection feature in most supported models. It is exceedingly difficult to truly brick an ECU with Atlas.
Please reach out to NAMR if your ECU is "bricked", or in other words it cannot communicate when recovery mode is expected. We offer a service to attempt recovery on capable ECUs in this more challenging state with specialized tooling at merely the cost of shipping as a courtesy to support our community.
Flash Recovery
Introduction
Description
Most vehicles have a manner in which you can recover the ECU should the flashing be incomplete. For the Subaru WRX (2015+), for example, your bootloader (never reprogrammed by Atlas) has logic which runs on start that will attempt to see if the flash had been correctly programmed. It does this by looking at the first and last sections of your programmed ROM to see if certain data it expects to be present are in place. As flash data is sent in a ordered fashion, it is unlikely that both sections will ever be correct if the reprogramming is ever interrupted. If these sections are not correct, your ECU will enter recovery mode. In recovery mode, your ECU cannot operate the vehicle, but instead is waiting for a new ROM to be uploaded.
If, for example, power is lost to the ECU while flashing (low battery/etc.), this is the mode you will more than likely end up in. If Atlas fully supports your vehicle and your ECU also has a recovery mode that Atlas can interact with, Atlas will handle interacting with your ECU in this recovery mode.
Bricked ECUs
Atlas Recovery Feature
Due to the nature of the Atlas brick protection feature, CAN bus devices on the car will not be able to communicate with the ECU and will likely light up your car's dashboard warning lights like a Christmas tree. This is fine, and should resolve after a complete flash and key cycle.
Atlas 2025.1 now ships with a brick protection feature. Due to its position within the bootloader, this feature is always accessible, even if the programming was incomplete or the tune contained bad code. Atlas will always try to reprogram the bootloader first, so even if it was your first time flashing the vehicle and it has ended up bricked, there is a good chance the feature is already installed.
To access this feature on an ECU that has been flashed previously by Atlas , first turn off the vehicle. Then, press and hold the Cruise Cancel switch on your steering wheel. Wait approximately 30 seconds. While holding this button, enter accessory mode:
- For key ignition vehicles, turn the key to the "ACC" position to enter this mode.
- For push-to-start vehicles, push the ignition button twice with no pedal input (Clutch or Brakes) to enter this mode.
The Cruise Cancel button can now be released.
This will activate an Atlas recovery feature in your ECU's bootloader, and the ECU will immediately enter recovery mode. At this point, you can follow the procedures in this document. This feature can be activated at any time under any circumstances as long as the vehicle has battery power. To cancel this recovery mode if the ECU is not bricked, simply key cycle the car.
If the above does not work and you have flashed the ECU with Atlas before, it is possible either the bootloader is truly bricked (see Unusual Circumstances).
Unusual Circumstances
Please reach out to NAMR if your ECU is "bricked", or in other words it cannot communicate when recovery mode is expected. We offer a service to attempt recovery on capable ECUs in this more challenging state with specialized tooling at merely the cost of shipping as a courtesy to support our community.
Procedure
Make sure the vehicle is in its "Accessory Mode" mode, with the engine not running, but the gauges active. You may see a Check Engine light in this mode.
For key ignition vehicles, turn the key to the "ACC" position to enter this mode.
For push-to-start vehicles, push the ignition button twice with no pedal input (Clutch or Brakes) to enter this mode.
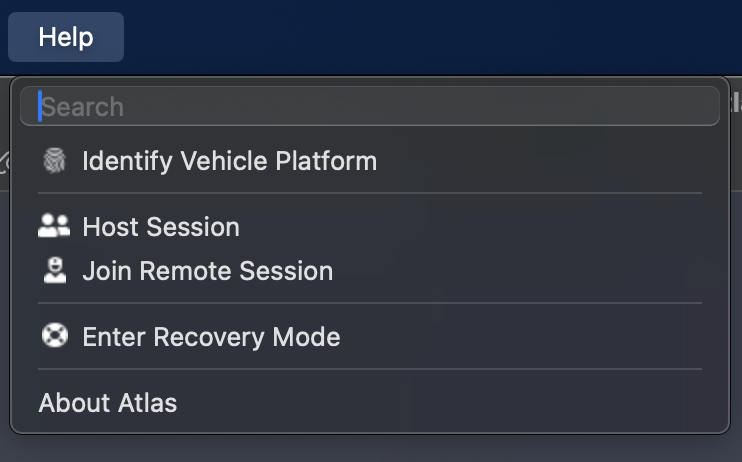
To enter Recovery Mode in Atlas, use the main menu to click Help -> Enter Recovery Mode.
You will be asked what vehicle is being recovered; select it from the list and click OK,
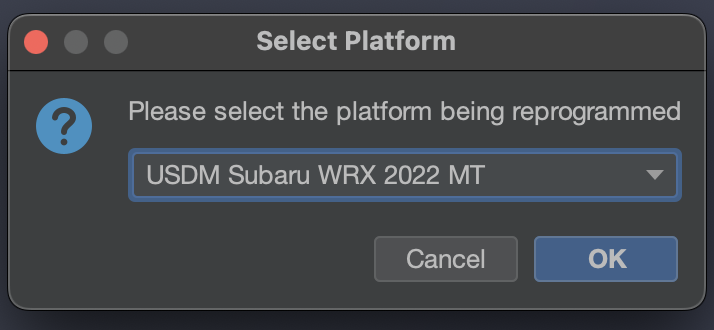
First, make sure you have selected your desired calibration to flash by selecting it in the Active Calibration dropdown menu in the upper-right part of Atlas. Then, click the Flash button,
You may be asked again which vehicle is being recovered; select the vehicle again from the list and click OK.
After a brief period, you will be greeted with this prompt,
- Make sure the Calibration listed is the one you want to flash
- Make sure the Vehicle listed is the one you want to flash
- If you are flashing a new tune, we strongly recommend checking Reset Learned Parameters.
There is no turning back or any chance to interrupt the reprogramming once you click Yes. Make sure you are positive before continuing with reprogramming!
We recommend double-checking your sitting position, reducing any risk to an unplug scenario at this time, and laptop battery charge at this time. When you are ready, click Yes.
The flash data will be reprogrammed to the ECU. Typically, for fast flashes, this can take anywhere from 10 seconds to 5 minutes. Depending on your adapter's capabilities and speed, this may take longer. If necessary, Atlas will automatically enter Recovery Mode to recover the ECU with the selected calibration, and the process may start over.
Once the process completes, you will be greeted with the Reprogramming Complete screen:
Turn off the vehicle's ignition in order to completely shut down the vehicle. Click OK.
Atlas will now be waiting for the vehicle to return to its Accessory mode it was previously in. Allow the vehicle 10 seconds to fully shut down any internal electrical components that may still be in a flashing state, using the ignition key or push-to-start button, once again return the vehicle to Accessory mode.
Atlas will then clear any non-persistent diagnostic trouble codes (DTC) that were accidentally tripped by any vehicle components during the flashing process, and the flashing process is complete!
Cloning an ECU
Introduction
In order to avoid risking damaging or "bricking" your OEM ECU, you may instead choose to clone your OEM ECU to another, spare ECU that you have purchased. However, you will run into issues with this without cloning the ECU, as the OEM ECU in your vehicle has keys that permit the ECU to authorize with your electrical system. One of these keys is the key used for immobilizer authorization. Without at least these keys in agreement, the vehicle will not start. This documentation page assumes you have an OEM ECU that is correctly trained/paired to the vehicle from factory (or a dealership/service specialist) as a cloning source, and a spare ECU to clone to.
Cloning an ECU involves downloading the region of memory in your ECU that holds these authorization keys. This section is smaller than and separate from your calibration (or tune) and is called EEPROM. You can download an EEPROM file and save it for later, or upload it to another ECU immediately after downloading it from the factory ECU.
Atlas does not support cloning or reprogramming ECUs that are actively programmed by other 3rd-party, aftermarket tuning products in order to respect and honor their confidentiality agreements with their customers. Please reach out to the vendors supplying those products to clone and support those modified ECUs, or "unmarry" the ECU from the aftermarket solution first before proceeding.
Cloning is relatively easy, but please ensure the following is true for your scenario:
- The vehicle has ample battery capacity remaining to supply the electrical system in your vehicle for at least 30 minutes (we recommend turning off headlights/auxiliary electrical components) - don't try to flash a vehicle if it hasn't been started and driven for a long period of time (allowing the alternator time to charge the battery again).
- Your laptop/computer/etc. has ample battery capacity as well to avoid shutdown for at least 30 minutes.
- The vehicle is parked, stationary in a safe location such that anything to go wrong, recovery procedures can be run without interruption.
- Ideally, is connected to a high-amperage battery charger supplying the battery itself with current. Flashing will work without a battery charger connected, but we strongly recommend using one whenever possible to avoid flashing interruptions that can cause your ECU to enter recovery mode.
- The connection you can make with the OBDII port is firm and does not risk being accidentally unplugged with your position in the vehicle (i.e. shifting, moving around) and how it relates to any wires running to the OBDII port.
Vehicle Connection
To reflash, Atlas needs to be connected to the target vehicle. Please see our supported adapter page for full details.
Tactrix OpenPort 2.0 "Connection failed" Error
Sometimes, the OpenPort 2.0 can lose sync with the computer running Atlas. Make sure you always first connect the adapter to your computer running Atlas. Then, connect the OBD2 end of the Tactrix to the vehicle's OBD2 port, often located underneath the trim in the steering wheel area. Doing this in the reverse order can sometimes cause the Tactrix to incorrectly synchronize with your computer and Atlas.
Step 1: Downloading EEPROM
Make sure the vehicle is in its "Accessory Mode" mode, with the engine not running, but the gauges active. You may see a Check Engine light in this mode.
For key ignition vehicles, turn the key to the "ACC" position to enter this mode.
For push-to-start vehicles, push the ignition button twice to enter this mode.
First, ensure the OEM ECU is connected to the vehicle. If it is not, disconnect the battery before replacing and installing the OEM ECU. Reconnect the battery after physically reinstalling and fully reconnecting the ECU.
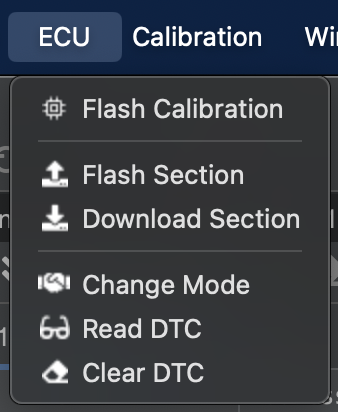
Then, using the main menu in Atlas, click ECU -> Download Section:
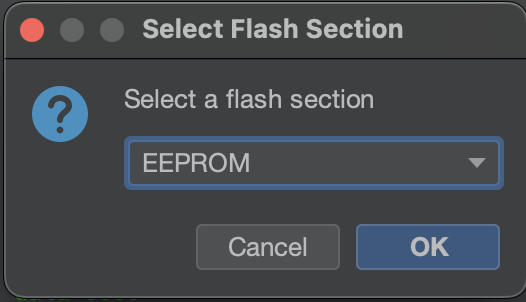
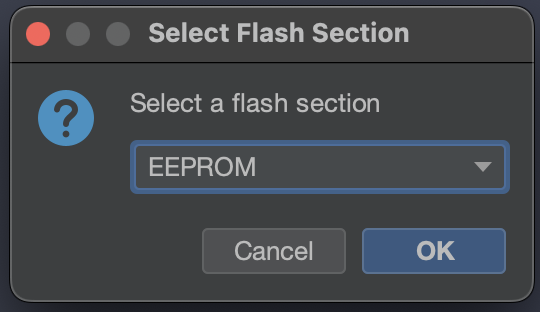
You will be asked which section is being downloaded. Select EEPROM, and click OK:
The EEPROM will be downloaded from the ECU, please wait for this to finish.

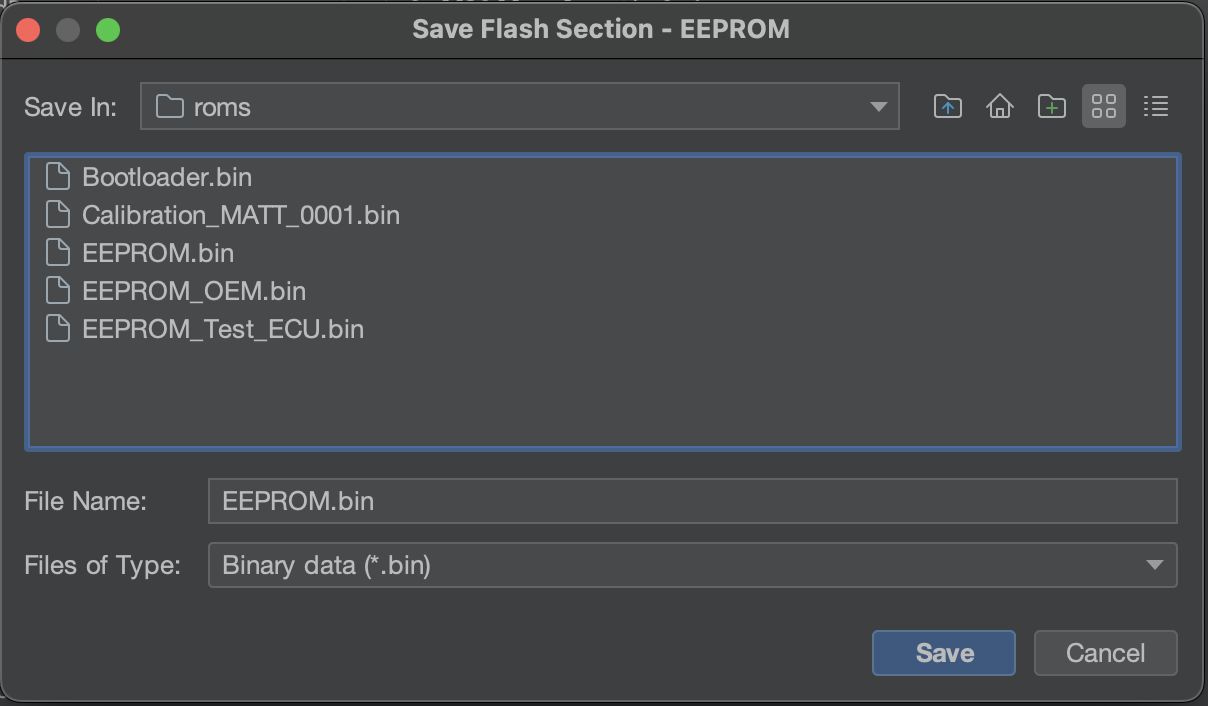
When the process has completed, save the downloaded binary data to a file on your computer:
Step 2: Uploading EEPROM
Make sure the vehicle is in its "Accessory Mode" mode, with the engine not running, but the gauges active. You may see a Check Engine light in this mode.
For key ignition vehicles, turn the key to the "ACC" position to enter this mode.
For push-to-start vehicles, push the ignition button twice to enter this mode.
Ensure the spare ECU is connected to the vehicle. Disconnect the battery before replacing and installing the spare ECU. Reconnect the battery after physically reinstalling and reconnecting the spare ECU.
Then, using the main menu in Atlas, click ECU -> Flash Section:

Select an EEPROM binary file that was previously downloaded from another ECU:

You will be asked which section is being uploaded. Select EEPROM, and click OK:
The EEPROM will be uploaded to the ECU. Wait for the process to finish:

Once the process completes, you will be greeted with the Upload Complete screen:
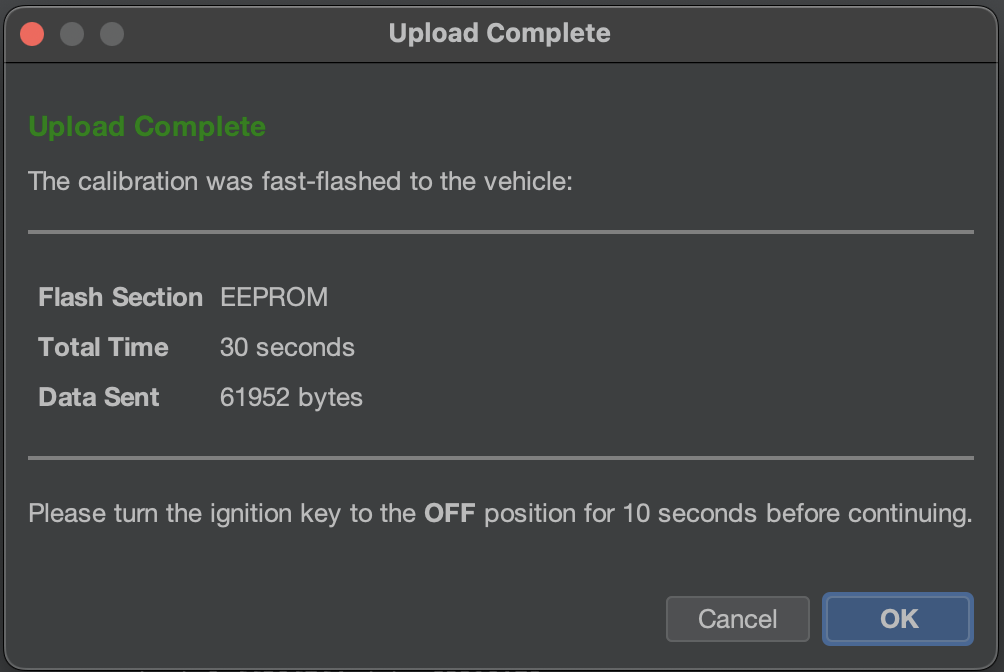
Turn off the vehicle's ignition in order to completely shut down the vehicle. Click OK.
Atlas will now be waiting for the vehicle to return to its Accessory mode it was previously in. Allow the vehicle 10 seconds to fully shut down any internal electrical components that may still be in a flashing state, and return the vehicle to Accessory mode.
Picking a Calibration to Log and Flash
Atlas and OEM Calibrations
Officially Supported Calibrations
What is officially supported?
Atlas provides at least one unmodified OEM calibration for every supported vehicle. Atlas does not ship with any pre-loaded, modified ("off the shelf") maps. For these off-the-shelf calibrations, please check in with our community for community-developed OTS maps; Discord is a great place to ask. They are typically well-tested and will be a great platform for you to start from.
In order to make the process of development easier, Atlas only supports the latest calibration from the manufacturer for each particular vehicle configuration. This is the standard procedure for most modern tuning softwares. For example, if your vehicle is a 2022 USDM Subaru WRX MT, there will be a specific calibration that represents the most up-to-date ROM that exists for your ECU, and this is the calibration that Atlas will provide and support.
What if the OEM releases a new calibration?
As new calibrations are released by the OEM and NAMR is made aware of these, we update Atlas to support them and release new versions of the software package accordingly. As this takes place, older calibrations are removed from the pre-loaded list to deter our end-users from programming these out-of-date calibrations. This same process takes place in the OEM software packages provided to dealerships; as new bundles are made available to dealerships, older calibrations are removed from rotation by the OEM.
However, any prior supported calibrations will continue to be supported for backwards-compatibility for flashing and logging alike. Our official stance is that when you find yourself in this situation, you should promptly rebase your tune onto the latest calibration available from the OEM. We strongly encourage this, as newer calibrations quite often involve recalls for various nuisances and potentially serious safety issues that have been identified.
If you live in the United States, you can typically see what issues are being addressed in newly released calibrations by searching for safety bulletins on the NHTSA website: https://www.nhtsa.gov/recalls.
Older Calibrations
What makes a calibration "old"?
As OEMs identify issues in their released calibrations, their corresponding software vendors supply updated calibrations to both the factory and the dealership network through internal processes. This activity from the OEM is typically seen as frequently as a quarterly basis and will even take place even after a particular model year of a vehicle has been retired, as deemed necessary by the feedback the OEM is receiving on their active calibrations.
What this means for you is your target vehicle may be running a calibration that - even if tuned - is presently out-of-date. While Atlas will recognize this calibration on the vehicle, it is likely that if it is old and out-of-date (super-ceded by a newer calibration), it is unsupported for both logging and flashing.
What do I do if my vehicle is on an unsupported calibration?
Although your calibration may be presently unsupported by Atlas, that doesn't mean you can't replace it with a newer calibration so you can log and tune your supported vehicle.
If you'd like to keep a copy of your old calibration for any reason, see our page on Cloning an ECU. You won't be cloning the calibration to another ECU, in this case, but that documentation page covers downloading it so you can preserve it somewhere if you ever want to flash it back to the ECU for any reason. It is worthwhile stating that this step is not strictly required to tune your car with Atlas.
Then, you can start by flashing the latest calibration for your car to the vehicle with Atlas. This will give you the same result as if you had dropped your car off at the dealership for recall service on the ECU. Once you're on the latest OEM calibration, you're all set to start logging with Atlas if you would like to collect base-line logs. From there, we recommend copying and modifying your base calibration to create your own tune, so the pre-shipped, latest OEM calibration remains unmodified if you ever need it.
Why does Atlas not support these?
When OEMs release new calibrations, we often see that the offsets for ROM elements such as tables, parameters, and so forth will change in unpredictable ways. Although the reason isn't significant to us, this could possibly be due to the unique development workflows each OEM implements to release any given calibration.
Atlas has an extensive set of modern tools, workflows, and automations built in to the software that enable the development team at NAMR to quickly adopt support of new calibrations by generating definitions against an unknown, new ROM file. However, nothing is perfect, and we take our quality assurance of definition accuracy very seriously. It is our policy that we will invest our time in new calibrations, but we do not extend support for calibrations that pre-date the initial support date of a given vehicle model on Atlas.
This means: if Atlas supports a 2022 USDM WRX MT on July 1st, 2024, any calibrations that were released prior to the calibration that was the latest as of that date are unsupported.
It really boils down to time and alignment with OEM to uphold safety and emissions standards. It takes time for us to bring in a new calibration, and we can't guarantee a uniform experience across our supported calibrations if we spread our development team thinly over several definitions for every single model. Having one supported calibration per model streamlines our development workflow so we can keep developing great features for our community.
Calibrations
Sharing Calibrations
Importing a Calibration/Tune
Atlas is Free and Open!
Atlas, as an open tuning platform, encourages sharing calibrations (tunes) within the community. At NAMR, we have a strong stance against Atlas locking tunes. When you import a calibration, you always have the ability to read it and modify it if you choose.
Import a Calibration
To flash a calibration to your vehicle after importing it, see Flashing a Calibration.
To import a calibration, first open Atlas. Then, ensure you have the same project opened that was used to export the calibration. Projects are specific to the vehicle you are tuning, such as the VB WRX or the VA WRX.
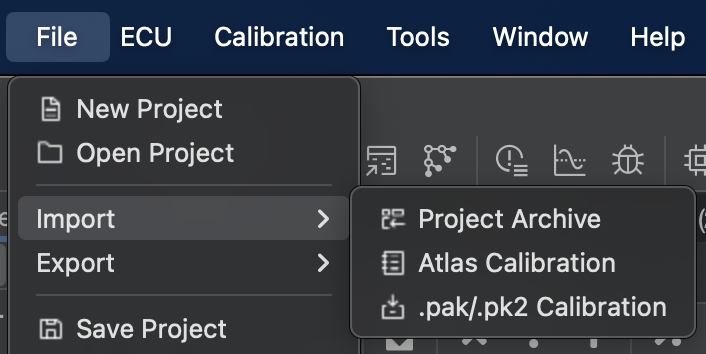
Once you have opened a project, use the File -> Import -> Atlas Calibration menu item to select an *.acf file and load the calibration data into Atlas. Once loaded, Atlas will automatically switch the project's active calibration to the imported tune so you can begin flashing and/or working immediately.
Export a Calibration
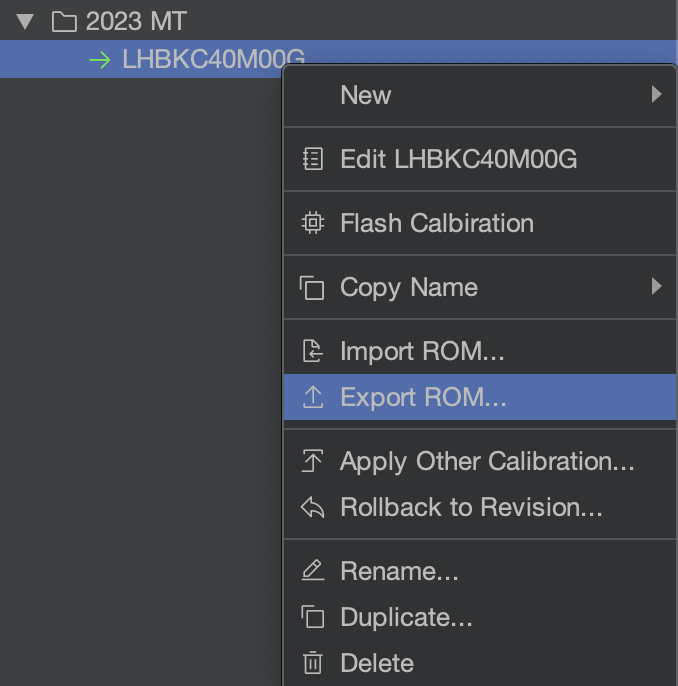
To export a calibration to share with others, first right-click the calibration in the Calibration tree. Then, using the "Export ROM..." option, save the calibration to a *.acf file and share that file with the recipient.
Datalogging
Atlas Datalogging Basics
Introduction
Tuning your car, ultimately, is a scientific endeavor. Without accurate data, you have little if anything to inform your decisions (inputs) to your tune as you reform it to meet your goals. Data-logging is an important method to receive feedback from the ECM (engine control module) for your engine's current condition and performance as it relates to your calibration (tune) on the vehicle.
Typically, a datalog is the recording of a series of values (or parameters) that are read (or polled) from the vehicle at a specific interval, or polling rate. Parameters included in a data log might be, for example, the engine speed (RPM), rate of mass air entering the intake tract (mass airflow, or MAF), ignition advance (or ignition timing), the air-fuel target ratio (or commanded AFR), coolant temperature, camshaft phase/timing, and so on. Each of these parameters are requested at once by your tuning software, such as Atlas, at a certain frequency schedule typically measured in polls-per-second or hertz (Hz). The higher the polling rate, the higher the precision is in the time domain for logged values.
The ECM records these values to Atlas by first briefly pausing the execution of the ECM logic, reading every value requested, and assembling all requested parameters in a single frame that is transmitted back to Atlas over the vehicle's communication system (typically the CAN bus). Atlas then records the date and time that the individual frame was received and adds it to the list of frames, which together form the recording.
The same system that is used to display gauges in Atlas is used for data-logging. The difference is these received (polled) frames are recorded for later viewing, as opposed to gauges which only use any given frame to update the gauge's corresponding parameter value and throw away the received data after it has been displayed on screen.
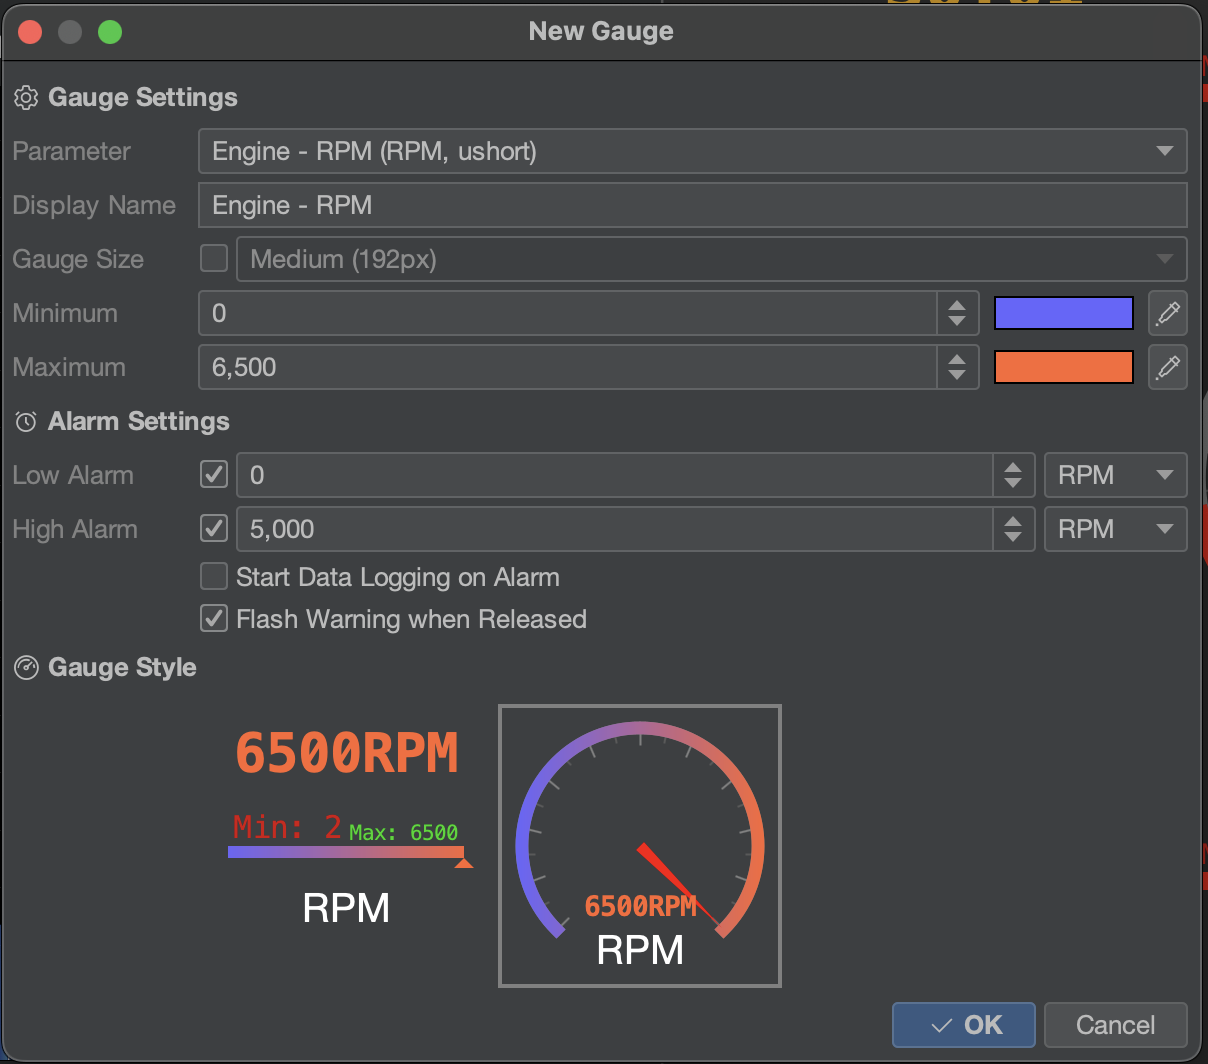
Atlas Gauges
The Atlas workflow separates parameters (things we define for you) as objects you can parameterize and log, called gauges. In Atlas, gauges -- though each based their own parameters -- are what are used for recording, not parameters themselves. You can customize gauges to your preference, including their theme, style, alarms (i.e. flashing), and scaling limits. To further help you organize your workspace, your customized gauges are grouped into something called a gauge set, or a collection of your gauges.
To access your gauge sets, look to the right of Atlas. If the panel is closed, you will notice a vertical strip of tabs, one of which is called Gauges. Click this to open your gauges and gauge sets.
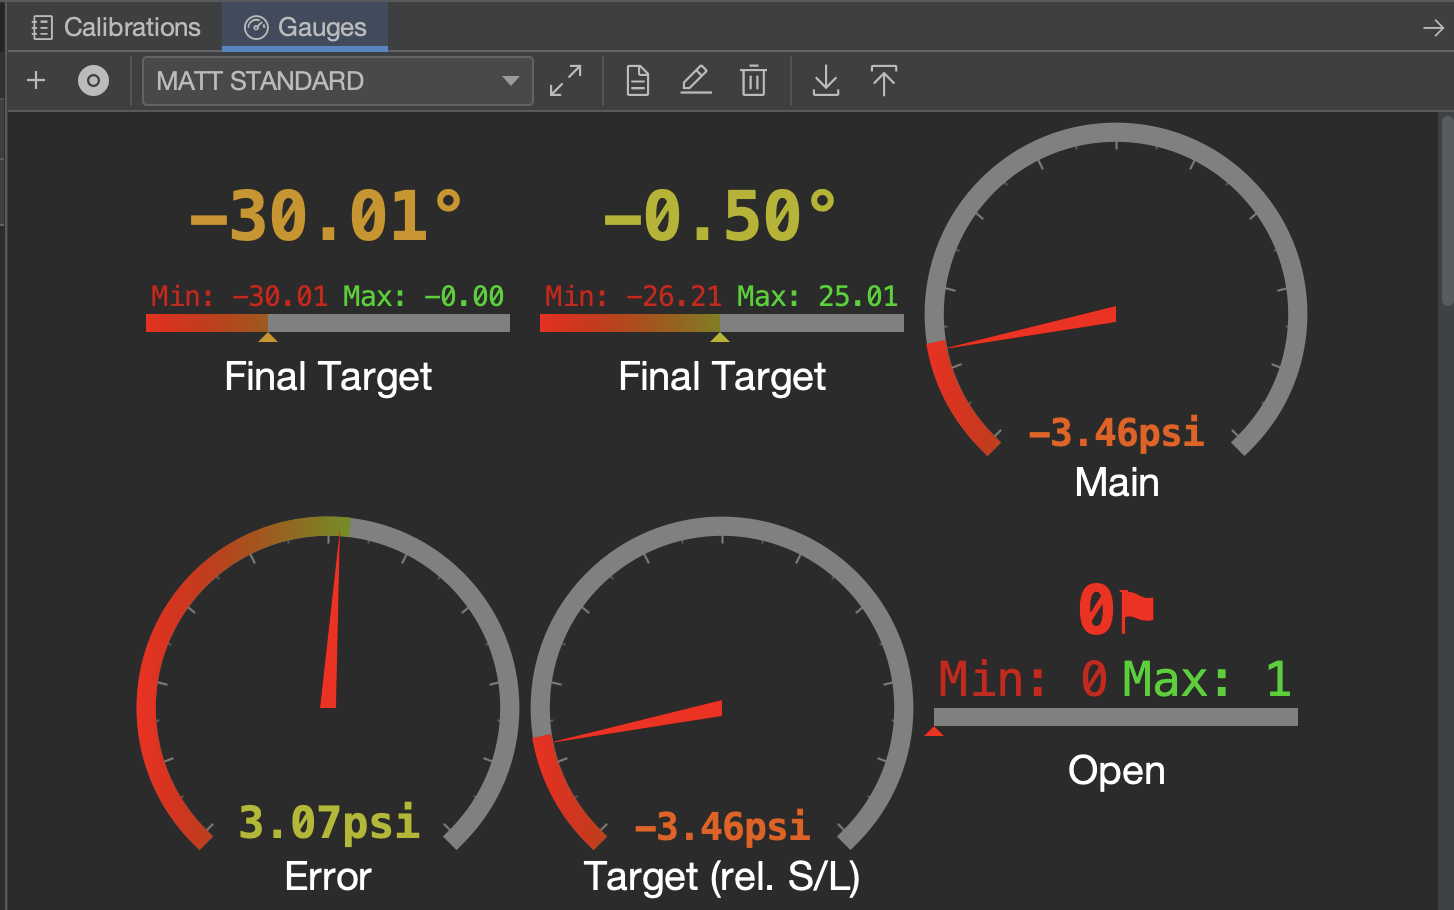 |
Gauge sets can be used to organize your workflow and the parameters you want to see when you are tuning on the weekend, driving to work, or perhaps logging on a track day. Some users prefer to have just one gauge set, while others prefer to have multiple for troubleshooting difficult tune problems that require one of our plethora of development-level parameters to trace.
To add a gauge, use the ![]() button.
button.
 |
|
Atlas Datalogger
To open the Data Logging window, press Control + D (Cmd+D on MacOS) or click the ![]() button in the Atlas toolbar.
button in the Atlas toolbar.
The Atlas Datalogger makes recording and viewing datalogs easy. At a high level, these are the headline features of the Atlas data logging ecosystem and why we think you should use it:
- Snappy, hardware-accelerated, optimized data and graphics pipeline based on OpenGL capable of easily presenting and navigating logs in excess of 30 minutes in length at any polling rates. You can load up our data-logger with well over 100,000 data-points on commodity hardware with next-to-zero screen lag on battery power.
- Community-friendly unencrypted Atlas Datalog Format (*.ADL file) that flexibly allows you to share your compressed logs for opinion and review with our community members.
- Track grouping and splitting that saves your grouping preferences for future logs.
- Easily export CSVs that can be imported into websites like https://datazap.me/.
- End-to-end 64bit nanosecond resolution from the recording, to the saved format (.ADL), to the rendered view.
- 32-bit floating point resolution for all parameters.
- Automatic unit conversion to your Atlas preferences (see File -> Atlas Settings).
- Live viewing while recording is on-going.
- Tailored interpolation style for the time axis based on the individual precision of each logged parameter.
- Automatic Y axis scaling and grouping for all parameters in a track. Parameters in a track with equivalent units will automatically be scaled relative to each-other, while other units will not.
- Strong emphasis on a dark theme and designed to reduce judder and flashing to make it easier on your eyes when you're tuning late at night.
- Design & create your own analytical/mathematical formulas to mix any data-logged parameters together, and add them post-recording as their own tracks with full support for all actions across the data logger.
- Quickly generate beautiful 3D scatter plots and histograms from any logged data for deeper analysis.
Main Layout

| Area |
Description |
| Menu | Access actions in the Data Logging window, such as loading and saving datalogs, exporting CSVs, changing the view of the displayed log, and generate tables and charts. |
| Toolbar | Offers quick actions such as recording a new datalog and navigating around the current log. |
| Time | Shows the currently shown timespan, in seconds, for the visible portion of the current log, and also a time delta if a marker has been placed. |
| Tabs | Allows you to open multiple logs at once and quickly switch between them. Each log occupies its own tab. |
| Tracks | A datalog is comprised of parameters in tracks. Tracks are stacked vertically on top of eachother in the datalogger, and by default are sorted alphabetically. These tracks may optionally be grouped together by control + clicking them and right-clicking them to group them. |
| Hovered | As the cursor is moved (or "scrubbed") across the log horizontally, a marker is shown that interpolates the value at the hovered location for all tracks. |
| Clicked | When an interesting point in the log is identified, click once with your mouse to place down a marker. Markers are useful to keep yourself aligned in the datalogger. |
| Legend | A legend is shown in each track to indicate which parameters are shown in the track. Each label's vertical position corresponds to the vertical positioning of all values shown next to each marker as you scrub your mouse or place a marker to make it an easy way to reference which value is which in a grouped track. |
| Ticker | A ticker is shown at the bottom of the log to help keep you oriented and referenced to the timing of events in your log. All logs start at 0 (zero) seconds and extend for the duration of the recording to the right. |
Scatter Plots & Histograms
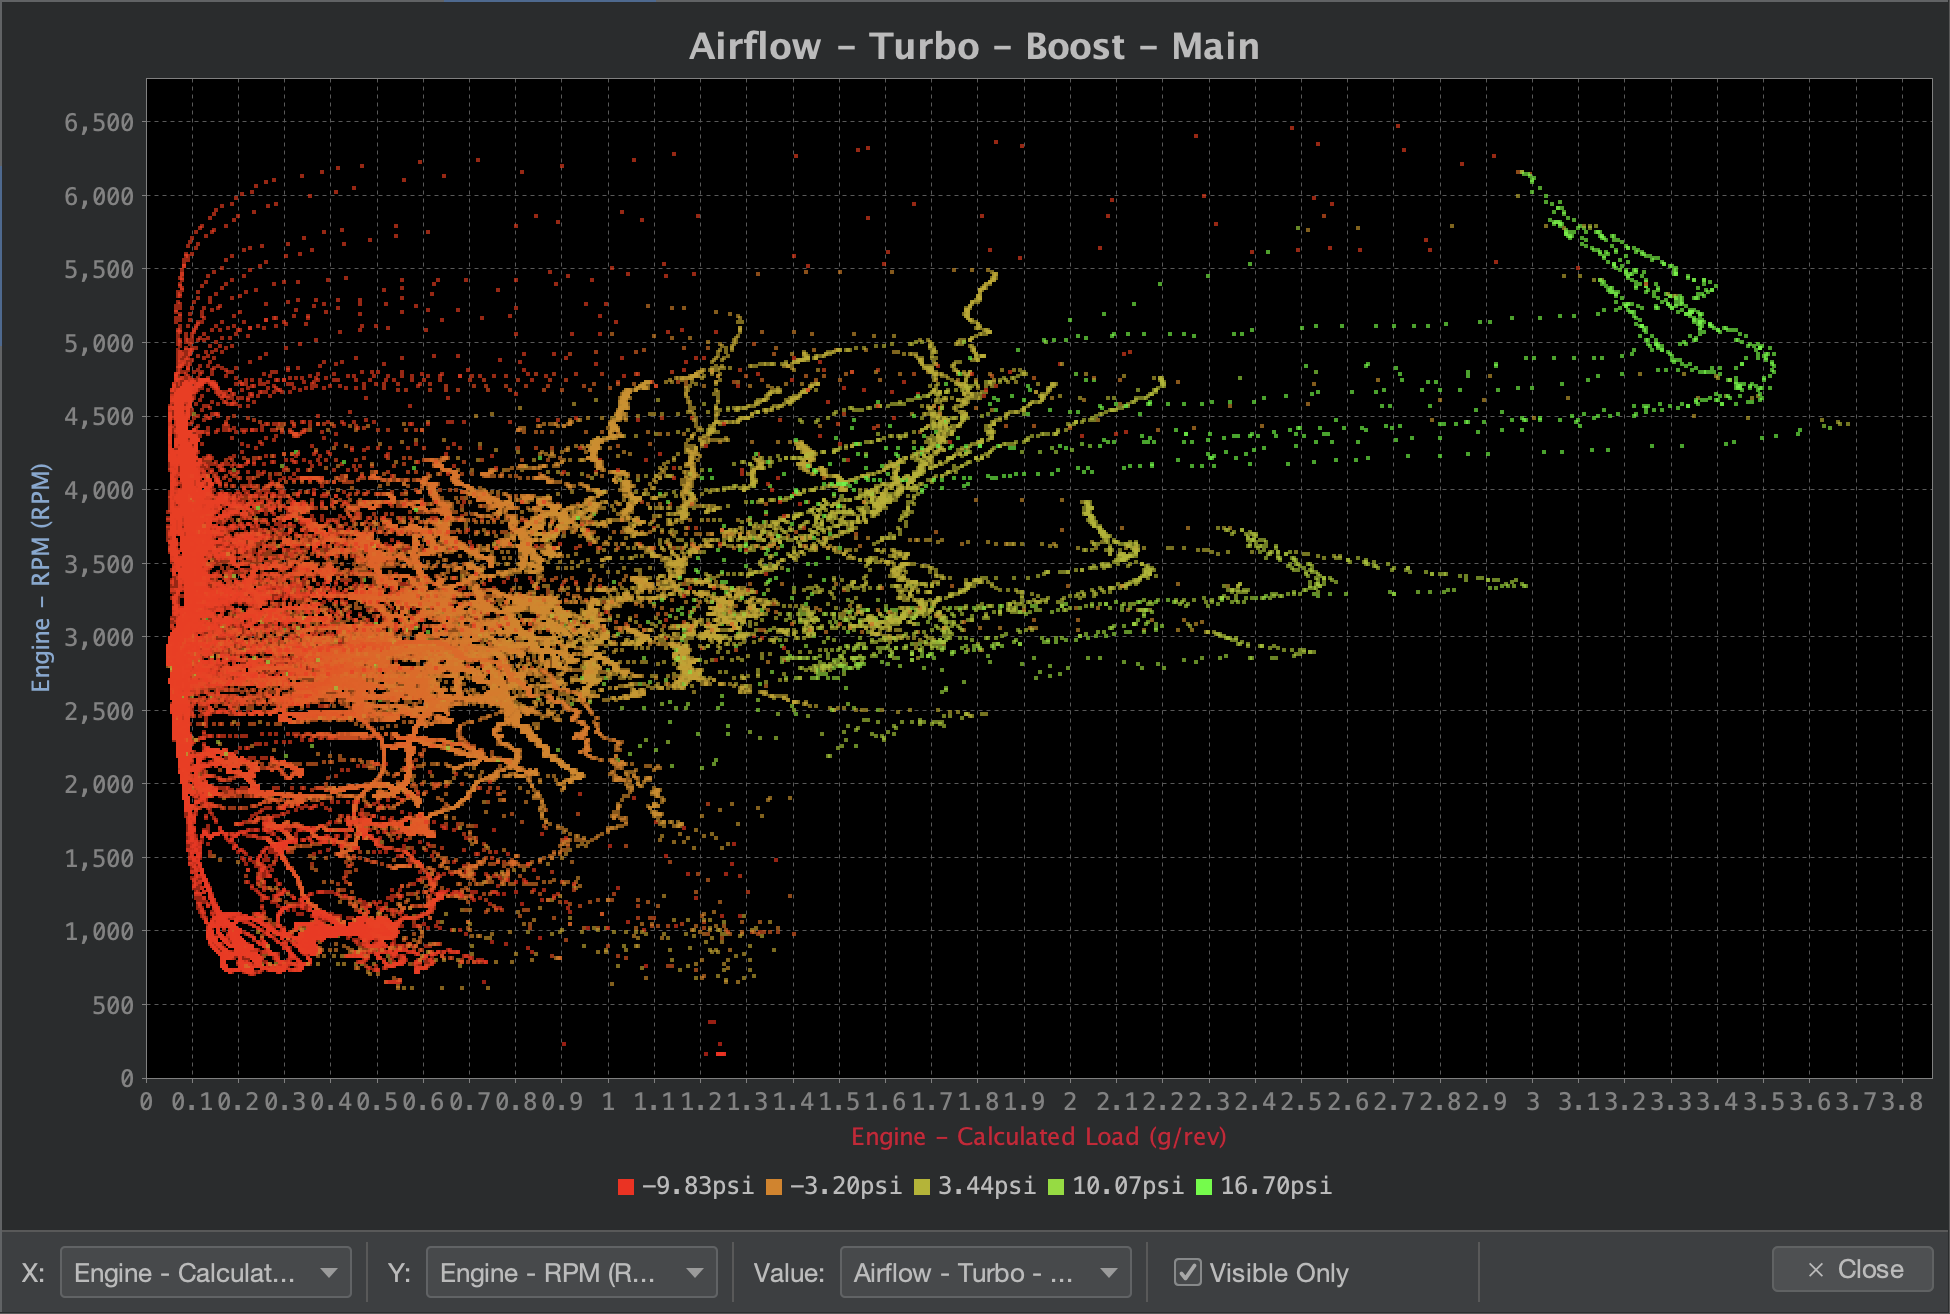
Scatter Plots
In order to provide you with more insight into your data, Atlas offers the ability for you to generate scatter plots. By plotting each data frame as a shaded point on a 2D surface, Atlas can give you insight to three mixed dimensions of data at once. To generate a scatter plot, right-click a track in the main data log view and click "Plot Scatter." The parameter you select will be preloaded into the X, Y, and Value (shading) fields, and you can refine your scatter plot from there. Right click on the plot to also save the plot as a PNG file.
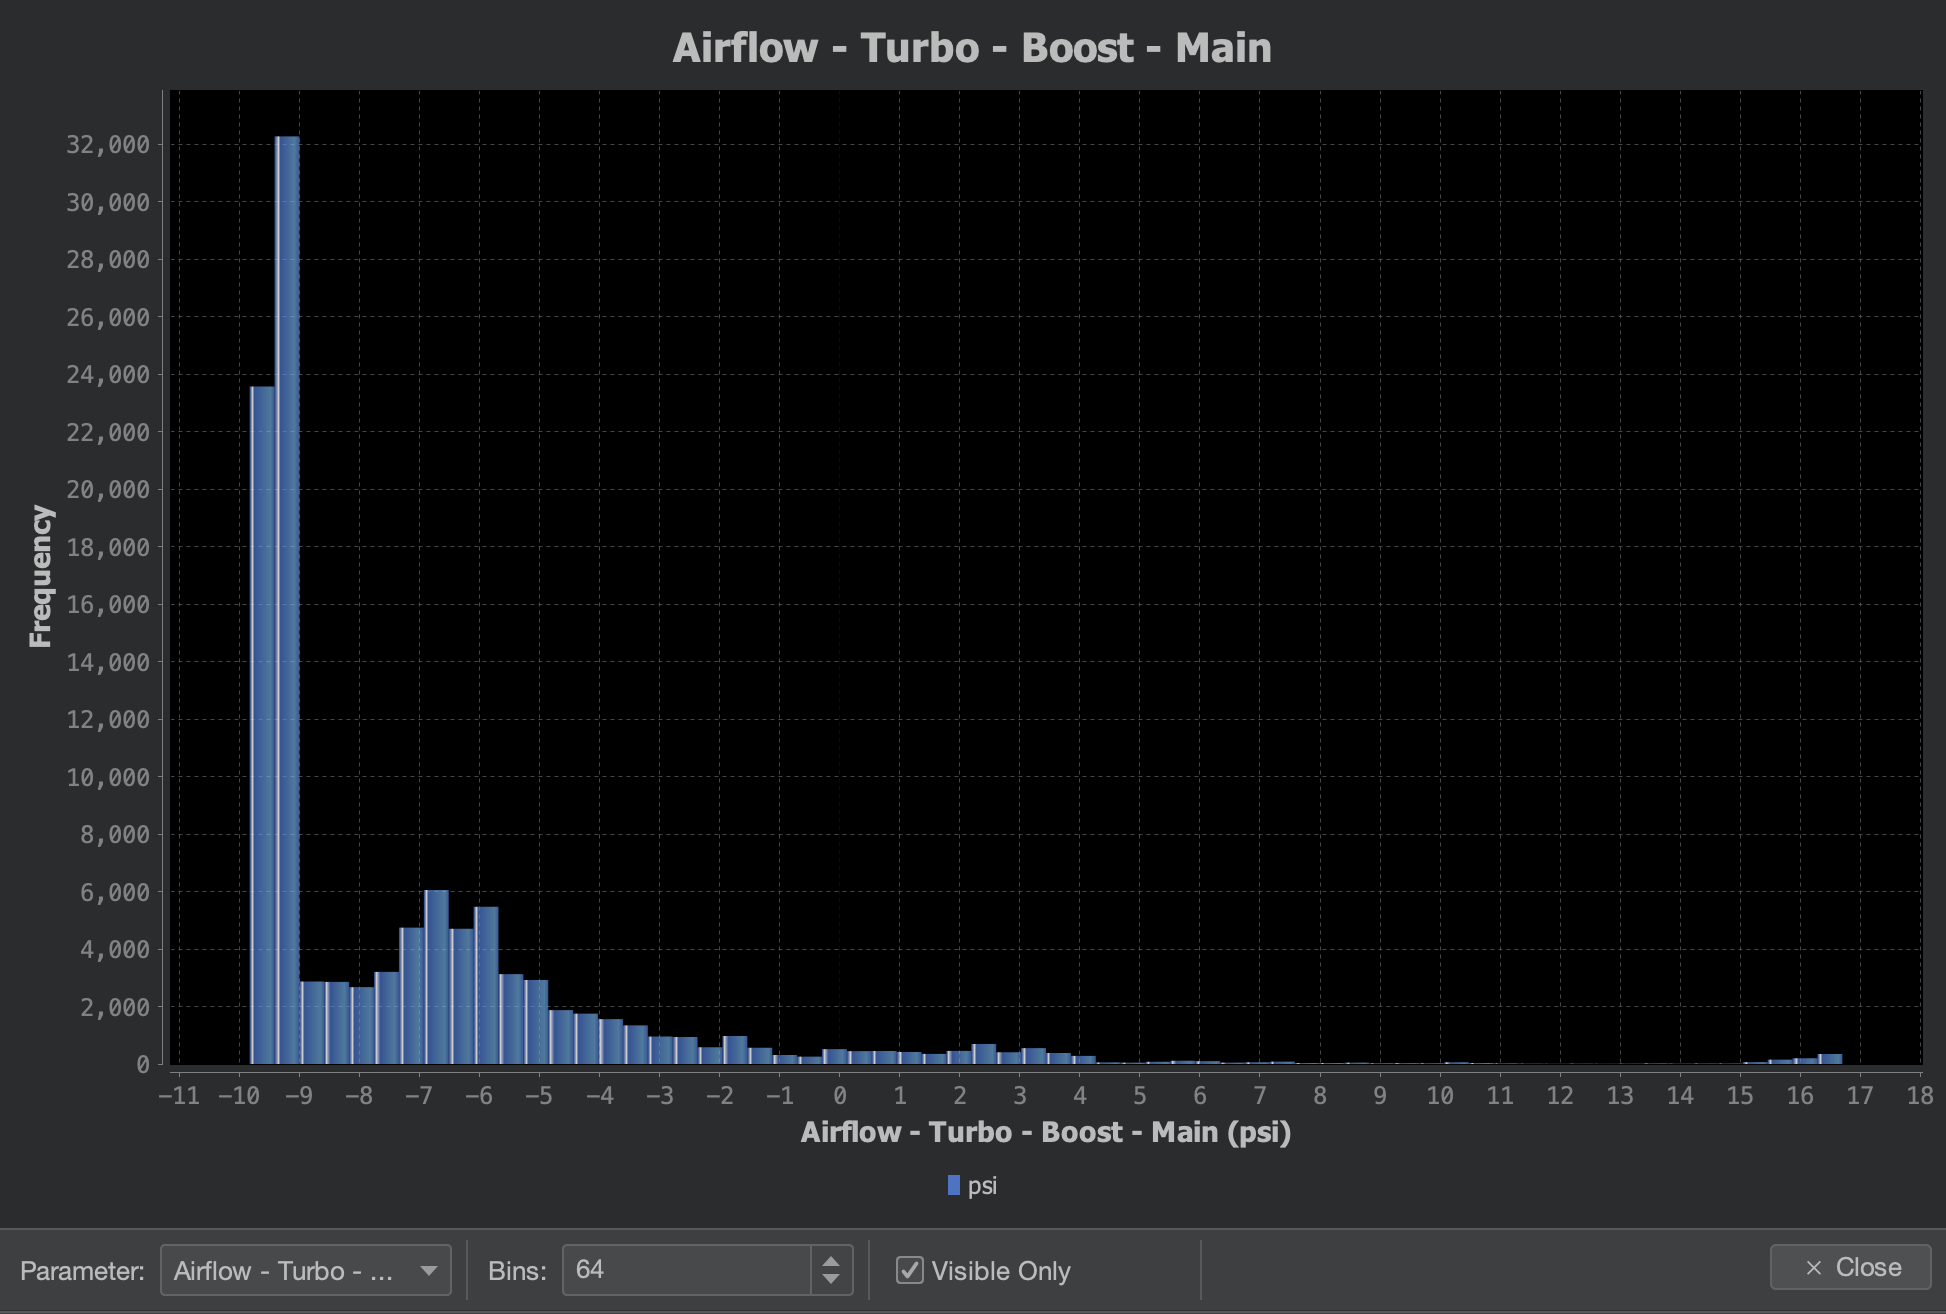
Histograms
Similarly to Scatter Plots, right-click a track in the data log view to plot a histogram.
Navigating Atlas & Parameter Names
Introduction
When designing or data-logging a tune, it is important to not only record accurate datapoints and modify the right tables, but it is also critical that you understand what each data stream (or parameter) and table is referencing. For example, data-logging a "Ignition Timing Base Final" parameter is not referencing the same ignition timing value as logging your tune's "Ignition Timing Commanded Final" parameter. Base Final =/= Commanded Final.
Atlas as a platform is designed to emphasize very granular access to ECU logic, and therefore the definitions we release to the public are often more detailed and expansive than you may be familiar with on other platforms. Due to the increasing complexities of modern ECUs, we choose to offer definitions that give you more access in between distinct pipeline elements of all tuning areas we support. Our objective is to give you everything you need to work around OEM behavior and logic and be able to ground your understanding of the ECU logic in lower-level parameters if you choose to do so.
Having more data points to log and more tables to edit does introduce a steeper learning curve, and so our definitions can be more confusing to navigate and comprehend quickly and may take longer to get familiarized with. However, we do have several systems in place that will assist you in getting comfortable with the Atlas workflow.
Navigating Atlas
Advanced Parameters
We have a system that allows you to filter generally unimportant tables and parameters. For these unimportant items, we will mark them as advanced. By default, Atlas doesn't show advanced parameters and tables as most tuners are not trying to get quite as specific as these elements offer. You can either choose to show or hide these based on the level of granularity you are looking for in your tune by using the Show advanced button in the project tree tab.
Here are some examples of advanced items:
- Tables (or maps) that are seldom, if ever, modified in a general street tune, but have some theoretical benefit or purpose to very specific applications or scenarios.
- Flags or modes that are generally only needed when diagnosing specific tune logic issues, such as operating mode numbers, esoteric low/high signals, or decision outputs needed during development of the definition for quality assurance purposes.
- Parameters that are highly granular, such as those used between pipeline stages. An example of this might be the "Table" output of a table that has been directly computed by the ECU, perhaps after blending operations (i.e. TGV & AVCS).
Documentation Graphs
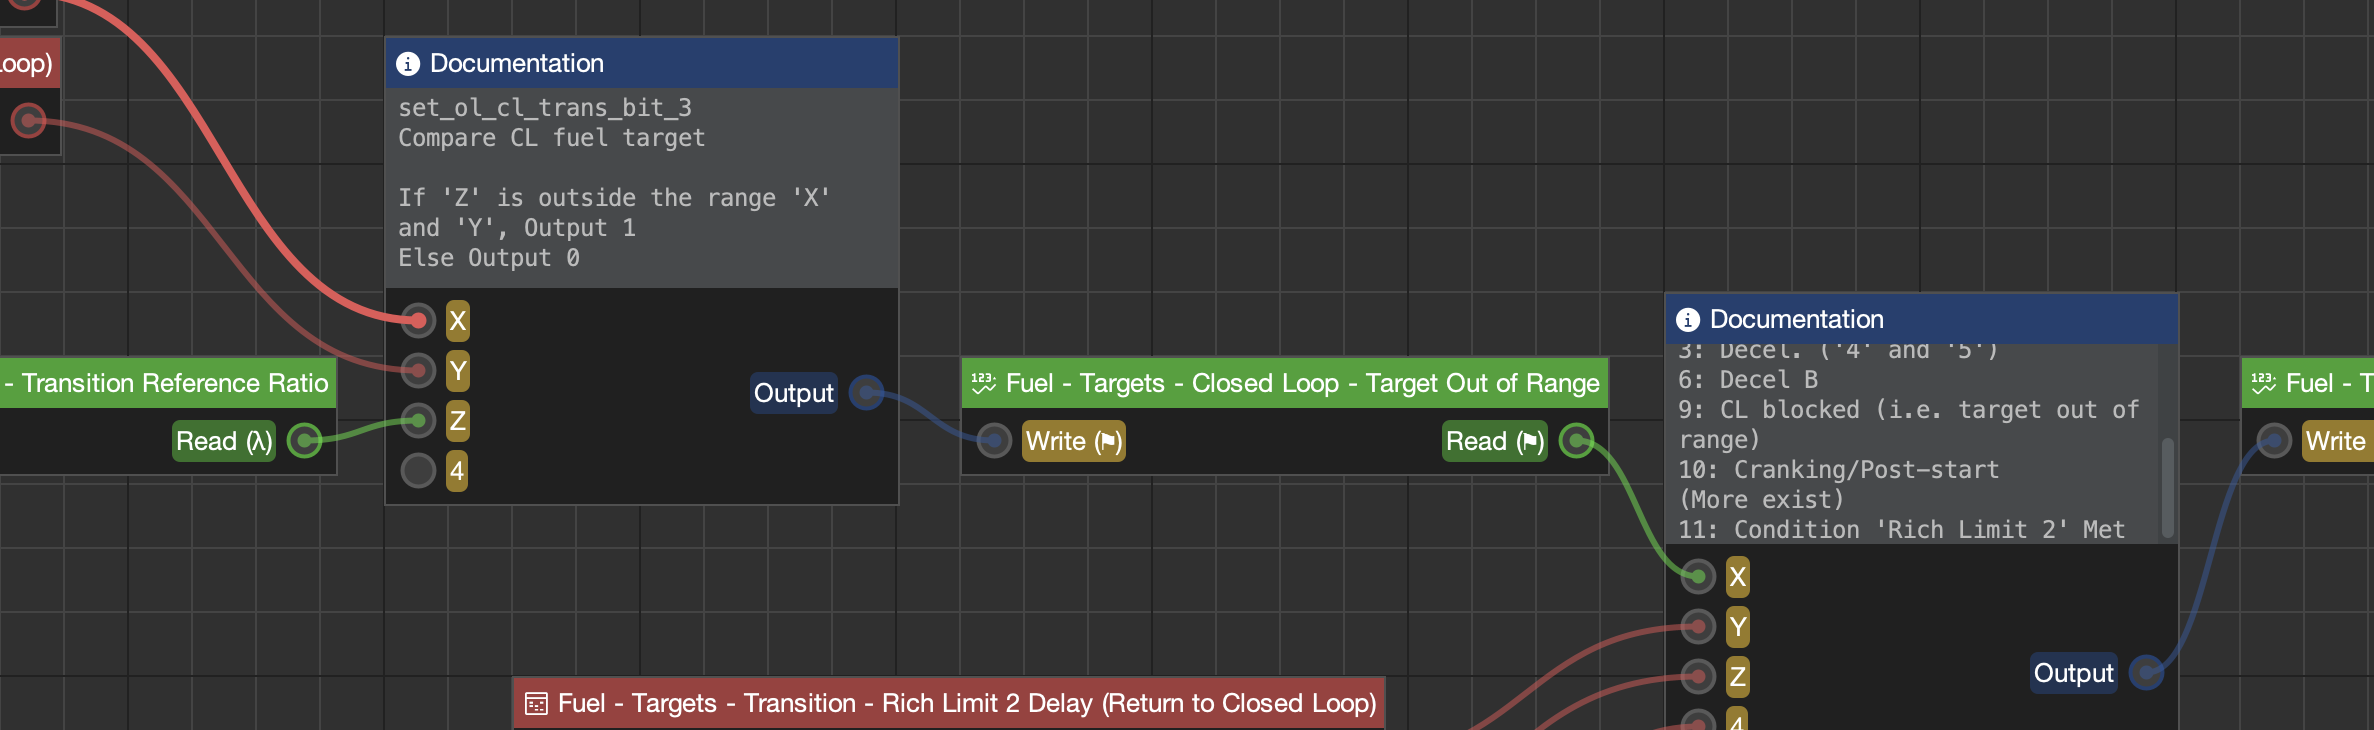
Additionally, Atlas is designed with a built-in graph editor that we use to create illustrations of ECU logic for you to explore. Laid out from left to right, several graphs are available in supported definitions that demonstrate the data flow of decisions in specific areas of ECU logic (i.e. Fuel, Ignition, Wastegate, etc.). If you are unfamiliar with tuning a platform, we strongly recommend taking a look at these. If you'd like to look up a table or parameter in a graph, right-click it in the project tree and click Find in Graph. This will automatically open the corresponding documentation graph, center the parameter or table you are searching for, and highlight it with a flash of yellow.
Parameter Names
Atlas does not have a strict standard for naming rules, but we do offer a dictionary of terms that assists in developing a loose standard for helping end-users understand what each parameter is intended to imply to you.
|
Naming |
Description |
Example |
|
Table or Base Table |
The value immediately after performing table lookup and any associated blending has been applied. For example, in the case of Subarus, this would be the result of all associated TGV and AVCS blending has been calculated on a given 4- or 5-dimensional map. |
Ignition - Primary - Base Table |
|
Base Base Final Final |
For different stages of a pipeline, Base and its corresponding Base Final may be used to distinguish distinct book-ends of a pipeline operation. For example, when combining ignition timing, there may be a "Combine Base" and a corresponding "Combine Final". It is also possible for parameters to be named simply as "Base" and "Base Final"
|
Idle - Target Airflow - Base - Base
Idle - Target Airflow - Base - Base Final |
|
Corrected |
For referential data in the ECU, and especially for the Mass Airflow (MAF) sensor, Corrected is used to name the corrected value of some base parameter, and is generally used by the ECU instead of a corresponding base parameter for its own calculations. |
Airflow - MAF - Mass Airflow Corrected (g/sec, uint) |
|
Primary Secondary |
These are placeholder names that names a parameter whose behaviors and relevance have been yet-uncharacterized. |
|
|
Target |
Target is used to name a parameter that the ECU will reference through some other proportional/integral control system; this is also knows as the set-point in closed loop control systems. Targets are not commanded to the hardware electrically.
A target might be, for example, the target airflow used to determine the commanded throttle position. Note that in this example, the target isn't commanded to the hardware, but the throttle position references the target and is commanded instead.
Another example would be boost. Boost pressure cannot be commanded; instead, the waste-gate position is 'Commanded' by using the boost target and target torque as a wastegate position table that is then adjusted through its own closed (or open) loop control system, referencing the 'Main Boost Target' table as the set point.
Targets may themselves be split into their own Target Base and Target Final sub-parameters. In these cases, Target Final will be the target that is referenced by the ECU for closed loop control, while Target Base is left in the definitions for diagnostic purposes and will likely be marked as advanced. |
Idle - Target Airflow - Target Base (g/sec, ushort)
Fuel - Targets - Closed Loop - Target Final (λ, ushort)
|
|
Commanded Final |
For parameters that involve digital to analog conversion (DAC), such as ignition timing and fuel pulse width, Commanded Final references the last available value before the ECU physically commands the associated hardware elements to take action. No other modifications or alterations of the value takes place in the pipe-line after this point.
In the case of ignition timing, this would be the amount of time referenced to determine a timer delay for ignition spark from the MCU.
For direct injection fuel platforms, this would be the pulse width of the signal sent to the injectors through any associated amplification hardware present on the ECU. |
Fuel - Pulse - Commanded Final
Ignition - Commanded Final
Airflow - Turbo - Wastegate - Position Commanded Final |
Project Tree
Support
Detailed adapter and vehicle support information
Installation
Using a Tactrix with Windows
Atlas uses it's own built-in device driver for the Tactrix OpenPort 2.0. When using Atlas with a Tactrix in a Microsoft Windows environment, the adapter should appear in Device Manager as a Communications Port (COM*) under the Ports (COM & LPT) device category.

Atlas will not be able to successfully communicate with the adapter if it appears under the Vehicle PassThru Interfaces category as a Tactrix Openport 2.0 J2534 Vehicle Interface.![]()
The Tactrix drivers must be uninstalled in order to proceed.
Driver Removal Steps
- Right click on Tactrix Openport 2.0 J2534 Vehicle Interface
- Select Properties
- Click the Driver tab in the Properties window
- Select Uninstall Device
- Restart your PC upon uninstaller completion
Supported Adapters
Atlas supports the following adapters and hardware through custom cross-platform device drivers that are built directly into Atlas. The listed adapters should work out of the box with no additional configuration required.
| Device | Platform | Connection | Type | Datalogging |
Flashing |
|---|---|---|---|---|---|
| Tactrix OpenPort 2.0 | Wired (USB-Mini B) |
OpenPort |
120Hz |
1~5 minutes |
|
| OBDLink MX+ | Wireless (Bluetooth 3.0) |
STN |
30Hz |
15~30 minutes |
|
| OBDLink EX | Wired (USB-A) |
STN |
60Hz |
5~20 minutes |
|
| Veepeak OBDCheck BLE+ | Wireless (Bluetooth LE) |
ELM327 |
20Hz |
30~60 minutes |


NAMR is always interested in expanding support to new adapters and hardware. If you have a device you’d like to see supported and isn’t listed here, please check our current hardware requests on GitHub and see if a ticket already exists for the device in question. If one doesn’t exist yet, consider opening a new adapter or hardware request.
Supported Vehicles
Complete List of Vehicles
| Make | Model (Chassis) | Model Year | Support Matrix | |||||||||||
|---|---|---|---|---|---|---|---|---|---|---|---|---|---|---|
| Subaru | WRX (VB) | 2026 |
|
|||||||||||
| Subaru | WRX (VB) | 2025 |
|
|||||||||||
| Subaru | WRX (VB) | 2024 |
|
|||||||||||
| Subaru | WRX (VB) | 2023 |
|
|||||||||||
| Subaru | WRX (VB) | 2022 |
|
|||||||||||
| Subaru | WRX (VA) | 2015-2021 |
|
|||||||||||
| Subaru | WRX STi (VA) | 2015-2021 |
|
|||||||||||
| Subaru |
BRZ (ZD8) |
2021+ |
|
USDM | AUDM | |||||||||
| Toyota | GR86 (ZN8) | 2021+ |
|
Legend
Supported (i.e. "2025.2")
Happy tuning! These vehicles are actively supported by Atlas with at least one calibration (ROM) that we ship with Atlas as of the version shown in the right-hand side of the badge. You must have installed at least the version shown to tune these supported vehicles, but we suggest you use the latest version of Atlas whenever possible.
We treat support for every vehicle as an ongoing maintenance responsibility. If we support a vehicle or configuration, that means we will continue to improve the definitions for it and provide updates as our priorities permit.
In Progress
These vehicle models and configurations are actively in progress and are a primary focus with the ongoing development of Atlas. In most cases, we just need a calibration (ROM) off of a vehicle from a volunteer. If being a part of the development process and helping bring Atlas to more corners of the community sounds appealing to you, check out the Supporting Your Vehicle section below.
Planned
These are the vehicle models and configurations we have identified to eventually support. Vehicles in this category are generally not in a closed beta yet, and may still be in the R&D phase within the development team. Because things change quickly, we do not report precise progress or ETA here on our documentation site in these stages. However, we encourage you to ask us about these vehicles and let us know your interest so we can continue to prioritize filling the biggest gaps in support that our community wants; Discord is a great place to express your interest in support for a specific vehicle configuration.
Market (USDM/AUDM/etc.)
Please note that Atlas does not permit reprogramming a vehicle with a calibration that is different than the market the vehicle was originally sold in. For example, Atlas cannot flash a USDM vehicle with a JDM calibration, and vice-versa.
In the above support matrix, this is the vehicle's market. Markets are regions of the world where an OEM might release a calibration. Due to differing emissions and vehicle safety regulations across the globe, OEMs calibrate vehicles slightly differently according to each legislative region.
- USDM: United States Domestic Market
- AUDM: Australian Domestic Market
- EUDM: European Domestic Market
- JDM: Japanese Domestic Market
Transmission (6MT/CVT/etc.)
In the above support matrix, this is the vehicle's transmission. Different transmission types have varying requirements for reprogramming (flashing). Support for a manual transmission vehicle (i.e. 6MT) doesn't necessarily indicate support for an automatic (i.e. CVT) vehicle model. Therefore, we split out our support matrix on transmission type as well.
- 5MT: 5-speed manual transmission
- 6MT: 6-speed manual transmission (i.e. TY75 or TY85 transmission for Subaru WRX)
- CVT: Automatic transmission (continuously variable transmission)
Supporting Your Vehicle
Getting a vehicle supported by Atlas is often a simple process, and very rarely carries with it any significant risk to your ECU - especially if we support similar configurations already. If you're interested in helping cross the finish line with support for your vehicle configuration, consider stopping by our Discord server and let us know what vehicle you own (or your customer owns) and we'll work together to build a plan for safely adding support for it. We do not charge anything to work with you on any vehicles in our In Progress category.
New Tables, Scaling Adjustments, etc.
Every supported vehicle is an ongoing maintenance responsibility for NAMR. Please report any missing, desired, erroneous definition elements to our GitHub project as a new issue, or stop by our Discord and drop us a line with the vehicle configuration and table or parameter you're interested in having exposed or corrected.
Can I Pay You to Change Priorities?
Unfortunately, we typically need to decline these offers. This is because we develop Atlas in a quarter-by-quarter basis and our releases are constantly scheduled-out with commitments made. Additionally, our project scope is presently centered on the Subaru and Toyota markets. However, there is no harm in asking us especially if your Subaru or Toyota project carries with it a large community.
Issues/Troubleshooting
Atlas is a relatively new software project, and while we strive to provide an easy to use and trouble-free product, errors may still arise. In this event, users are urged to check our currently known issues. If this is a new issue, please open a support ticket on our GitHub or drop by the NAMR Atlas Community on Discord.